Tutorial: Django REST with React (and a sprinkle of testing)
 Table of Contents
I wrote a book!
"Decoupled Django". Understand and build decoupled Django architectures for JavaScript frontends.
Please read
This post dates back originally to 2019. Two years in modern web development are equal to an eon. The approach outlined here is not inherently bad, but it could fall short for larger teams, and due to potential breaking changes in webpack and the related tooling, it can become hard to keep up with changes. Frameworks like Next.js are a more solid choice for building complex React projects these days.
Django REST with React: what you will learn
In the following tutorial you'll learn:
- how to build a simple Django REST API
- how to structure a Django project with React
Django REST with React: requirements
To follow along with the tutorial you should have:
- a basic understanding of Python and Django
- a basic understanding of JavaScript (ECMAScript 2015) and React
- a newer version of Node.js installed on your system
Ready? Let's get started!
Setting up a Python virtual environment, and the project
First things first make sure to have a Python virtual environment in place. Create a new folder and move into it:
mkdir django-react && cd $_Once done create and activate the new Python environment:
python3 -m venv venv
source venv/bin/activateNOTE: from now on make sure to be always in the django-react folder and to have the Python environment active.
Now let's pull in the dependencies:
pip install django djangorestframeworkWhen the installation ends you're ready to create a new Django project:
django-admin startproject django_react .Now we can start building our first Django app: a simple API for listing and storing contacts.
Django REST with React: building a Django application
A Django project can have many applications. Each application ideally should do one thing. Django applications are modular and reusable, if another project needs the same app over and over we can put that app in the Python package manager and install it from there.
To create a new application in Django you would run:
django-admin startapp app_nameIn our case, still in the project folder run:
django-admin startapp leadsThis will create our new leads app in the django-react folder. Your project structure now should be:
(venv) your@prompt:~/Code/django-react$ tree -d -L 1
.
├── django_react
├── leads
└── venv
Now let’s tell Django how to use the new app. Open up django_react/settings.py and add the app in INSTALLED_APPS:
INSTALLED_APPS = [
    'django.contrib.admin',
    'django.contrib.auth',
    'django.contrib.contenttypes',
    'django.contrib.sessions',
    'django.contrib.messages',
    'django.contrib.staticfiles',
    'leads.apps.LeadsConfig', # activate the new app
]
So far so good! In the next section we'll add our first model.
Django REST with React: creating a Django model
With the app in place it's time to create our first model. A model is an object representing your table's data. Almost every web framework has models and Django makes no exception.
A Django model may have one or more fields: each field is a column in your table. Before moving forward let's define our requirements for the lead application.
Since I'm collecting contacts I can think of a Lead model made of the following fields:
- a name
- an email
- a message
(Feel free to add extra fields! Like phone for example). Let's not forget a timestamp field as well! Django does not add a created_at column by default.
Open up leads/models.py and create the Lead model:
from django.db import models

class Lead(models.Model):
    name = models.CharField(max_length=100)
    email = models.EmailField()
    message = models.CharField(max_length=300)
    created_at = models.DateTimeField(auto_now_add=True)
A quick note about models: take your time to check Django fields documentation. When planning a model try to choose the most appropriate fields for your use case. With the model in place let's create a migration by running:
python manage.py makemigrations leadsFinally migrate the database with:
python manage.py migrateGreat! In the next sections we'll talk about serializers and views. But first a note about testing.
Django REST with React: a sprinkle of testing
At this point you may wonder "Valentino, how about testing?" Rather than annoying you with a TDD tutorial I'll give you some tips instead.
I've seen a ton of Django tutorials starting like so:
class SomeModelModelTest(TestCase):
    def setUp(self):
        SomeModel.objects.create(
            name=fake.name(),
            email=fake.email(),
            phone=fake.phone_number(),
            message=fake.text(),
            source=fake.url()
        )
    def test_save_model(self):
        saved_models = SomeModel.objects.count()
        self.assertEqual(saved_models, 2)
Don't do that. There's no point in testing neither a vanilla Django model nor the Django ORM. Here's a good starting point for testing in Django:
- do not test Django built-in code (models, views, etc)
- do not test Python built-in functions
Do not test what is already tested! So what should I test? Have you added a custom method to a Django model? Test it! Do you have a custom view? Test it! But, how do I know what to test exactly?
Do yourself a favour. Install coverage:
pip install coverageThen, every time you add some code to your application run coverage with:
coverage run --source='.' manage.py testThen generate the report:
coverage htmlYou'll see exactly what to test. If you prefer seeing the report on the command line run:
coverage reportWait, are you still there? I'm impressed! Hold tight, in the next section we'll take a look at serializers!
To learn more about testing in Django see Django Testing Cheat Sheet.
Django REST serializers
What is serialization? What is a Django REST serializer? Serialization is the act of transforming an object into another data format. After transforming an object we can save it to a file or send it through the network.
Why serialization is necessary? Think of a Django model: it's a Python class. How do you render a Python class to JSON in a browser? With a Django REST serializer!
A serializer works the other way around too: it converts JSON to objects. This way you can:
- display Django models in a browser by converting them to JSON
- make CRUD request with a JSON payload to the API
To recap: a Django REST serializer is mandatory for operating on models through the API. Create a new file named leads/serializers.py. The LeadSerializer takes our Lead model and some fields:
from rest_framework import serializers
from .models import Lead

class LeadSerializer(serializers.ModelSerializer):
    class Meta:
        model = Lead
        fields = ('id', 'name', 'email', 'message')
As you can see we're subclassing ModelSerializer. A ModelSerializer in Django REST is like a ModelForm. It is suitable whenever you want to closely map a Model to a serializer.
Save and close the file. In the next sections we'll take a look at views and urls.
Setting up the controll... ehm the views
Coming from other frameworks you may find surprising that Django has no controllers.
A controller encapsulates logic for processing requests and returning responses. In the traditional MVC architecture there is the Model, the View, and the Controller. Example of MVC frameworks are Rails, Phoenix, Laravel.
Django is a MVT framework. That is, Model – View – Template. There are many types of views in Django: function views, class based views, and generic views.
Some developers prefer function views in place of class based views. Personally I am a big fan of the latter. When I pick Django it's because I value development speed, DRY, less code.
I see no point in writing views by hand when there's already a set of sane defaults. Here's my rule of thumb:
Use function views only if the time spent customizing a generic view is more than the time spent writing the view by hand. As with plain Django, in Django REST framework there are many ways for writing views:
- function based views
- class based views
- generic API views
For the scope of this tutorial I will use generic API views. Our simple app should:
- list a collection of models
- create new objects in the database
By taking a look at the generic API views documentation we can see that there's a view for listing and creating models: ListCreateAPIView, which takes a queryset, and a serializer_class.
Open up leads/views.py and create the view:
from .models import Lead
from .serializers import LeadSerializer
from rest_framework import generics

class LeadListCreate(generics.ListCreateAPIView):
    queryset = Lead.objects.all()
    serializer_class = LeadSerializer
That is. With 3 lines of code we created a view for handling GET and POST requests. What's missing now? URL mapping! In other words we should map URLs to views.
How? Head over to the next section.
Setting up the rout... ehm the urls
Our goal is to wire up LeadListCreate to api/lead/. In other words we want to make GET and POST requests to api/lead/ for listing and creating models.
To configure the URL mapping include the app urls in django_react/urls.py:
from django.urls import path, include

urlpatterns = [
    path('', include('leads.urls')),
]
Next up create a new file named leads/urls.py. In this file we'll wire up LeadListCreate to api/lead/:
from django.urls import path
from . import views

urlpatterns = [
    path('api/lead/', views.LeadListCreate.as_view() ),
]
Finally let's enable rest_framework in INSTALLED_APPS. Open up django_react/settings.py and add the app there:
# Application definition

INSTALLED_APPS = [
    # omitted for brevity
    'leads.apps.LeadsConfig',
    'rest_framework'
]
Now you should be able to run a sanity check with:
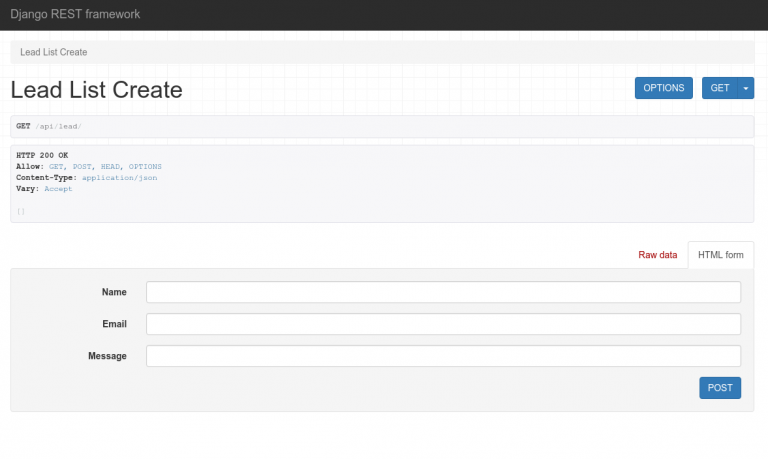
python manage.py runserverHead over http://127.0.0.1:8000/api/lead/ and you'll see the browsable API:
NOTE: it is a good idea to disable the browseable API in production with this configuration:
REST_FRAMEWORK = {
    'DEFAULT_RENDERER_CLASSES': (
        'rest_framework.renderers.JSONRenderer',
    )
}
While there create some contact in the builtin form. In the next section we'll get into React.
Django and React together
A lot of fellow Python developers struggle with a simple question. How to glue Django and $insert_frontend_library_here together?
Should React router take over the routing? Should React mount a component in each Django template? (If you want to lose sanity). I'd say "it depends". It depends on how much JavaScript do you need. But how much JavaScript is too much?
Jokes aside there are many ways for setting up a Django project with React. I see the following patterns (which are common to almost every web framework):
Option 1. React in its own "frontend" Django app: load a single HTML template and let React manage the frontend (difficulty: medium)
Option 2. Django REST as a standalone API + React as a standalone SPA (difficulty: hard, it involves some form of token-based authentication)
Option 3. Mix and match: mini React apps inside Django templates (difficulty: simple, but not so maintainable in the long run)
And here are my advices. If you're just starting out with Django REST and React avoid option 2. Instead go for option number 1 (React in its own "frontend" Django app) if:
- you're building an app-like website
- the interface has lot of user interactions/AJAX
- you're ok with Session based authentication
- there are no SEO concerns
- you're fine with React Router
In fact keeping React closer to Django makes easier to reason about authentication. You can exploit the Django builtin authentication for registering and logging in users.
Use the good ol' Session authentication and do not worry too much about tokens and JWT.
Go for option number 3 (mini React apps inside Django templates) if:
- the website doesn’t need much Javascript
- SEO is a big concern and you can't use Node.js for Server Side Rendering
In the next section we'll go with the option 1.
Setting up React and webpack
Disclaimer: My tutorials are free, no strings attached. This means I have no obligation to keep them constantly updated to the latest releases of the packages. Keep also in mind, frontend tooling changes so fast that I can't keep up updating every single blog post as quickly as webpack introduces breaking changes in the configuration. If something doesn't work for you, drop me a polite email, and I'll try to fix the tutorial if I have time. Enjoy!
We already know how to create a Django app so let's do it again for the frontend app:
django-admin startapp frontendYou'll see a new directory called frontend inside your project folder:
(venv) your@prompt:~/Code/django-react$ tree -d -L 1
.
├── django_react
├── frontend
├── leads
└── venv
Let's also prepare a directory structure for holding React components:
mkdir -p ./frontend/src/componentsand static files:
mkdir -p ./frontend/{static,templates}/frontendNext up we'll set up React, webpack and babel. Move in the frontend folder and initialize the environment:
cd ./frontend && npm init -yNext up install webpack and webpack cli:
npm i webpack webpack-cli --save-devNow open up package.json and configure two scripts, one for production and one for development:
"scripts": {
    "dev": "webpack --mode development --entry ./src/index.js --output-path ./static/frontend",
    "build": "webpack --mode production --entry ./src/index.js --output-path ./static/frontend"
},
Close the file and save it. Now let's install babel for transpiling our code:
npm i @babel/core babel-loader @babel/preset-env @babel/preset-react --save-devNext up pull in React:
npm i react react-dom --save-devNow configure babel with a .babelrc (still inside ./frontend):
{
    "presets": [
        "@babel/preset-env", "@babel/preset-react"
    ]
}
NOTE: if you're getting regeneratorRuntime is not defined with async/await in your React components replace the above babel configuration with the version presented in this post.
And finally create a webpack.config.js for configuring babel-loader:
module.exports = {
  module: {
    rules: [
      {
        test: /\.js$/,
        exclude: /node_modules/,
        use: {
          loader: "babel-loader"
        }
      }
    ]
  }
};
Now we're ready to roll! (Welcome to modern frontend!).
Django REST with React: preparing the frontend app
First things first create a view in ./frontend/views.py:
from django.shortcuts import render


def index(request):
    return render(request, 'frontend/index.html')
Then create a template in ./frontend/templates/frontend/index.html:
<!DOCTYPE html>
<html>
<head>
  <meta charset="utf-8">
  <meta name="viewport" content="width=device-width, initial-scale=1">
  <title>Django REST with React</title>
</head>
<body>
<div id="app">
    <!-- React will load here -->
</div>
</body>
{% load static %}
<script src="{% static "frontend/main.js" %}"></script>
</html>
As you can see the template will call ./frontend/main.js which is our webpack bundle. Configure the new URL mapping to include the frontend in ./project/urls.py:
urlpatterns = [
    path('', include('leads.urls')),
    path('', include('frontend.urls')),
]
Next up create a new file named ./frontend/urls.py:
from django.urls import path
from . import views


urlpatterns = [
    path('', views.index ),
]
Finally enable the frontend app in ./project/settings.py:
# Application definition

INSTALLED_APPS = [
    # omitted for brevity
    'leads.apps.LeadsConfig',
    'rest_framework',
    'frontend', # enable the frontend app
]
At this point you can give it a shot on http://127.0.0.1:8000/ (while still running Django development server). You'll see a blank page for now.
In the next section we'll finally add React to the mix.
Django REST with React: the React frontend
To keep things simple we'll create a simple React component that will display our data. If you haven't got anything in the database it's a good moment to populate your application with some contact.
Run the development server and head over http://127.0.0.1:8000/api/lead/ to insert some leads.
Now create a new file in ./frontend/src/components/App.js. It will be a React component for fetching and displaying data:
import React, { Component } from "react";
import { render } from "react-dom";

class App extends Component {
  constructor(props) {
    super(props);
    this.state = {
      data: [],
      loaded: false,
      placeholder: "Loading"
    };
  }

  componentDidMount() {
    fetch("api/lead")
      .then(response => {
        if (response.status > 400) {
          return this.setState(() => {
            return { placeholder: "Something went wrong!" };
          });
        }
        return response.json();
      })
      .then(data => {
        this.setState(() => {
          return {
            data,
            loaded: true
          };
        });
      });
  }

  render() {
    return (
      <ul>
        {this.state.data.map(contact => {
          return (
            <li key={contact.id}>
              {contact.name} - {contact.email}
            </li>
          );
        })}
      </ul>
    );
  }
}

export default App;

const container = document.getElementById("app");
render(<App />, container);NOTE: you can write the very same component as a function with the useEffect hook.
Save and close the file. Now create the entry point for webpack in ./frontend/src/index.js and import your component:
import App from "./components/App";Now we're ready to test things out. Run webpack with:
npm run devstart the development server:
python manage.py runserverand head over http://127.0.0.1:8000/. (If you see "Something went wrong" make sure to migrate and populate your database)
You should finally see your data in a React component:

Pretty simple. But it works!
Django REST with React: conclusions, where to go from here
In this tutorial we built a simple Django REST/React project. You learned how to:
- build a simple Django REST API
- structure a Django project with React
- connect React to the Django REST API
Feel free to experiment by adding more features to the project (like authentication).
The approach we took when connecting the React frontend to Django was a bit simplistic, but represent a strong foundation of what you'll do in the real world.
To learn more about the challenges you'll face with webpack and Django in bigger projects make sure to read also Using webpack with Django: it's not easy as you think.
I also gave a talk on the topic: "Decoupling Django with Django REST and React" at Pycon Italy X in Florence. Slides here!
Thanks for reading!
