React Redux Tutorial for Beginners: The Complete Guide (2020)
 Table of Contents
When I first started learning Redux I wish I had some "Redux for dummies". I felt dumb because I couldn't wrap my head around actions, action creators, reducers. How about middleware? You've got to be kidding me!
So during those days I started teaching Redux for the sake of learning more, while writing my own React Redux tutorial. Since then, I learned a lot and this React Redux tutorial is an effort for helping you too to learn Redux, in the simplest way.
This tutorial includes Redux Toolkit as well.
Psst.. Cerchi un tutorial Redux in italiano?
Read this: Redux, where are we now?
Redux has changed a lot. Redux toolkit has become the recommended way to use Redux, new codebases based on Redux toolkit will differ a lot from what we used to write in the past.
However the fundamental building blocks of Redux are still action, reducers, middleware, and the store, and you need a good knowledge of these lego blocks to be proficient with Redux and Redux toolkit.
In this tutorial I'll cover "classic" Redux code first, and React/Redux with connect. Later you'll see how to refactor to Redux Toolkit. If you prefer watching videos, then check out this free Redux course of mine.

Now enjoy the reading!
React Redux tutorial: who this guide is for
The following React Redux guide is for JavaScript developers with a good grasp of ES6 and React. There are countless React tutorials online if you want to refresh your understandings, but if you're just starting out I suggest reading Getting Started with React by Tania Rascia.
React Redux tutorial: what you will learn
The guide covers mostly Redux with React because of the wide adoption of this combination but Redux can also be used as a stand-alone library without any frontend framework/library.
So in the following guide you will learn:
- what is Redux
- Redux's building blocks
- how to use Redux stand-alone
- how to use Redux with React
React Redux tutorial: a minimal React development environment
Before starting off make sure to have a React development environment in place.
To make one you can follow How to set up React, webpack, and Babel or even better, use create-react-app:
npx create-react-app react-redux-tutorialOnce done you're good to go.
React Redux tutorial: what is the state?
What is Redux? To answer that question we must first talk about state in JavaScript web applications. Consider a simple user flow:
"as a user I can click a button named Click me and a modal should appear soon after".
Guess what, even in this trivial interaction there is a state we must deal with. For example, we can describe the initial state of the app as a plain JavaScript object:
const state = {
  buttonClicked: 'no',
  modalOpen: 'no'
}
When the user clicks, the state changes and we have:
const state = {
  buttonClicked: 'yes',
  modalOpen: 'yes'
}
How do you reliably keep track of these state changes? What if the state is mutated by accident by some unrelated piece of logic? Is there a library that can help us?
Also, if you worked with React before the term state should be no surprise to you. I guess you already wrote some "stateful" React component like this:
import React, { Component } from "react";

class ExampleComponent extends Component {
  constructor(props) {
    super(props);

    this.state = {
      articles: [
        { title: "React Redux Tutorial for Beginners", id: 1 },
        { title: "TypeScript tutorial for beginners", id: 2 }
      ]
    };
  }

  render() {
    const { articles } = this.state;
    return <ul>{articles.map(el => <li key={el.id}>{el.title}</li>)}</ul>;
  }
}
A stateful React component is a JavaScript class (with React hooks that's no longer the case).
In a React component the state holds data which can be rendered to the user. The state in React could also change in response to actions and events: in fact you can update the local component’s state with this.setState().
So, in general a typical JavaScript application is full of state. For example, state is:
- what the user sees (data)
- the data we fetch from an API
- the URL
- the items selected inside a page
- eventual errors to show to the user
Having seen the basics let's now talk about what problem Redux tries to solve.
What problem does Redux solve?
So, state is everywhere in web application. From now on I'll talk about state and logic in the context of a typical React application, but consider these concept applicable to any frontend architecture, regardless of the specific library. The thing is, can you imagine how much state a web application application has?
Even an innocent single page app could grow out of control without clear boundaries between every layer of the application. This holds particularly true in React.
Yeah, you can get by with keeping the state within a parent React component (or in context) as long as the application remains small. Then things will become tricky especially when you add more behaviours to the app. At some point you may want to reach for a consistent way to keep track of state changes. Not only, I’d say that frontend components shouldn’t know about the business logic. Ever.
Unfortunately a ton of logic gets stuffed into frontend components these days. Is there an alternative to this agony?
Redux can solve exactly those issues. It might not be clear in the beginning, but Redux helps giving each frontend component the exact piece of state it needs.
Even better, Redux can hold business logic inside its own layer (middleware), alongside with the code for fetching data. The benefits of this approach are manifold.
In the next sections we'll see when and how to use Redux in your applications. First a couple of words about the quintessential question: "should I use Redux"?
React Redux tutorial: should I use Redux?
I must admit I'm a bit biased here because I'm fond of Redux and I suggest it whenever I join a new project. But maybe you don't need neither Redux, nor alternatives like Mobx and friends. Even more if you're working on a simple project.
In React for example there are many ways to avoid using Redux: children props, the context API.
But for medium to bigger projects I always found Redux (or an equivalent) almost mandatory: state management libraries beautifully keep logic and behaviours abstracted away from the UI. UI testability skyrockets and so developer productivity. If you look at it from another perspective you may argue that Redux has a cost. It adds another layer of abstraction to your application.
What cost are you willing to pay? Convoluted frontend components or multiple layers of abstractions?
Enough talking. In the next section we’ll start building a proof of concept to introduce:
- Redux fundamental principles
- Redux alongside with React
Again, make sure you have a React development environment ready to use.
React Redux tutorial: getting to know the Redux store
When I approached Redux for the first time I was confused. There is too much terminology: action, reducer, middleware. But on top of that it wasn't clear to me how were all the moving parts glued together? There were some minions or what? In Redux there are no minions (unfortunately).
What orchestrates all the cogs is the store. Repeat with me: the store. The store in Redux is kind of magic and holds all of the application's state.
So let's create a store to start playing with Redux. Move into your React development environment and install Redux:
cd react-redux-tutorial

npm i redux --save-dev
Create a directory for the store:
mkdir -p src/js/storeNext up create a new file, src/js/store/index.js and initialize the store:
// src/js/store/index.js

import { createStore } from "redux";
import rootReducer from "../reducers/index";

const store = createStore(rootReducer);

export default store;
As you can see, store is the result of calling createStore, a function from the Redux library. createStore takes a reducer as the first argument and in our case we passed in rootReducer (not yet present).
You may also pass an initial state to createStore, useful for server side rendering and state preloading, but for now we’re not interested in that. The most important concept to understand here is that the state in Redux comes from reducers. Let’s repeat: reducers produce the state of your application.
Armed with that knowledge let’s move on to our first Redux reducer.
React Redux tutorial: getting to know Redux reducers
What’s a reducer? A Redux reducer is just a JavaScript function. It takes two parameters: the current state and action (more about actions soon).
In a typical React component the local state might be mutated in place. In Redux you're not allowed to do that. The third principle of Redux (as outlined by its creator) prescribes that the state is immutable and cannot change in place.
In other words the reducer must be pure. A pure function returns the exact same output for the given input. Despite this terminology reasoning about a reducer is not that hard.
In our example we'll be creating a simple reducer which takes initial state and action as parameters. Create a directory for the root reducer:
mkdir -p src/js/reducersThen create a new file, src/js/reducers/index.js:
const initialState = {
  articles: []
};

function rootReducer(state = initialState, action) {
  return state;
};

export default rootReducer;
Notice how the initial state is passed as a default parameter. But as of now our reducer does nothing, other than returning the initial state.
In the next section we'll add an action to the mix, and things will become interesting.
React Redux tutorial: getting to know Redux actions and named constants
Redux reducers are without doubt the most important concept in Redux. Reducers produce the state of an application. But how does a reducer know when to generate the next state?
The second principle of Redux says the only way to change the state is by sending a signal to the store. This signal is an action. So "dispatching an action" means sending out a signal to the store.
Confused? The reassuring thing is that Redux actions are nothing more than JavaScript objects. This is how an action looks like:
{
  type: 'ADD_ARTICLE',
  payload: { title: 'React Redux Tutorial', id: 1 }
}
As you can see it's a JavaScript object with two properties: type and payload.
The type property drives how the state should change and it's always required by Redux. The payload property instead describes what should change, and might be omitted if you don't have new data to save in the store.
As a best practice in Redux we wrap every action within a function, so that object creation is abstracted away. Such function takes the name of action creator: let’s put everything together by creating a simple action creator.
Create a directory for actions:
mkdir -p src/js/actionsThen create a new file, src/js/actions/index.js:
// src/js/actions/index.js

export function addArticle(payload) {
  return { type: "ADD_ARTICLE", payload }
};
You can notice that the type property is a string. Strings are prone to typos and duplicates and for this reason it's better to declare actions as constants. Create a new folder for them:
mkdir -p src/js/constantsThen create a new file, src/js/constants/action-types.js:
// src/js/constants/action-types.js

export const ADD_ARTICLE = "ADD_ARTICLE";
Now open up again src/js/actions/index.js and update the action to use action types:
// src/js/actions/index.js

import { ADD_ARTICLE } from "../constants/action-types";

export function addArticle(payload) {
  return { type: ADD_ARTICLE, payload };
}
As you can see we're starting to deal with multiple files. That's the main pet peeve with Redux for most people. You can follow the Redux duck convention if you want, it keeps every Redux related piece in a single file.
One step closer to have a working Redux application, but first we need to tweak the reducer for catching the new action.
Refactoring the reducer
We left last section with the following question: how does a reducer know when to generate the next state? The key here is the Redux store. When an action is dispatched, the store forwards a message (the action object) to the reducer.
At this point the reducer says "oh, let's look at the type property of this action". Then depending on the action type, the reducer produces the next state, eventually merging the action payload into the new state.
Earlier we created a reducer that does nothing. Let's fix it! Open up src/js/reducers/index.js and update the reducer with an if statement for checking the action type:
// src/js/reducers/index.js

import { ADD_ARTICLE } from "../constants/action-types";

const initialState = {
  articles: []
};

function rootReducer(state = initialState, action) {
  if (action.type === ADD_ARTICLE) {
    state.articles.push(action.payload);
  }
  return state;
}

export default rootReducer;
There is also a line of code which pushes the action payload into the initial state. Seems the right thing to do. But it's wrong! Our reducer breaks the main Redux principle: immutability.
Array.prototype.push is an impure function: it modifies the original array. But there's more. We're also changing the initial state in place.
We need a fix. First we can return a new JavaScript object with Object.assign. This way we keep the original state unaltered. Then we can use Array.prototype.concat instead of Array.prototype.push for keeping the original array:
import { ADD_ARTICLE } from "../constants/action-types";

const initialState = {
  articles: []
};

function rootReducer(state = initialState, action) {
  if (action.type === ADD_ARTICLE) {
    return Object.assign({}, state, {
      articles: state.articles.concat(action.payload)
    });
  }
  return state;
}

export default rootReducer;
Now the initial state is left pristine and the resulting state is just a copy of the initial state. Remember two key points for avoiding mutations in Redux:
- use concat, slice, or the spread operator for arrays
- use
Object.assignor object spread of objects
If this stuff about immutability feels boilerplate to you redux starter kit has solved the problem. Take a look at it once you finish this tutorial.
In the next section we’ll play with Redux from the browser's console. Hold tight!
React Redux tutorial: Redux store methods
This will be super quick, I promise.
You might be surprised to know that Redux itself is a small library (2KB) and the most important methods are just three:
- getState for reading the current state of the application
- dispatch for dispatching an action
- subscribe for listening to state changes
We will play in the browser’s console with them. To do so we need to export the store and the action we created as global variables. Create a new file named src/js/index.js and place there the following code:
import store from "../js/store/index";
import { addArticle } from "../js/actions/index";

window.store = store;
window.addArticle = addArticle;
Now open up src/index.js as well, clean up its content and update it as follows:
import index from "./js/index";Now run the development server with:
npm starthead over http://localhost:3000/ and open up the console with F12. Start off by reading the current state:
store.getState();
// output: {articles: Array(0)}
Zero articles. In fact we haven’t update the initial state yet. To make things interesting we can listen for state updates with subscribe.
The subscribe method accepts a callback that will fire whenever an action is dispatched. Dispatching an action means notifying the store that we intend to change the state.
Register the callback with:
store.subscribe(() => console.log('Look ma, Redux!!'));To change the state in Redux we need to dispatch an action. To dispatch an action we'll call the dispatch method. We have one action for now: addArticle for adding a new item to the state. Let’s dispatch the action with:
store.dispatch( addArticle({ title: 'React Redux Tutorial for Beginners', id: 1 }) );Right after running the above code you should see "Look ma, Redux!!". To verify that the state changed run again:
store.getState();
// output: {articles: Array(1)}
And that's it. This is Redux in its simplest form. Was that difficult?
Once you feel confident head over the next sections. We'll go straight to connecting React with Redux!
React Redux tutorial: connecting React with Redux
After learning Redux I realized it wasn't so complex. I knew how to access the current state with getState. I knew how to dispatch an action with dispatch and how to listen for state changes with subscribe.
Yet I didn't know how to couple React and Redux together. I was asking myself: should I call getState from React? How do I dispatch an action from a React component? And so on.
Redux is framework agnostic. You can use it with vanilla Javascript. Or with Angular. Or with React. There are bindings for joining together Redux with your favorite framework/library.
For React there is react-redux, a library for which you need to learn just one method for now: connect. What does it do? Unsurprisingly it connects a React component with the Redux store.
You will use connect with two or three arguments depending on the use case:
- a mapStateToProps function (you can name it also "select")
- a mapDispatchToProps function
mapStateToProps does exactly what its name suggests: it connects a part of the Redux state to the props of a React component. By doing so a connected React component will have access to the exact part of the store it needs.
mapDispatchToProps does something similar, but for actions. mapDispatchToProps connects Redux actions to React props. This way a connected React component will be able to send messages to the store.
In the next section we'll finally get our hands dirty. We'll build a super simple application made of three components:
- an App component
- a List component for displaying articles
- a Form component for adding new articles
React Redux tutorial: App component and Redux store
Before starting off install react-redux with:
npm i react-redux --save-devI said that mapStateToProps connects a portion of the Redux state to the props of a React component. You may wonder: is this enough for connecting Redux with React? No, it's not. We also need Provider, an high order component from react-redux.
Open up src/index.js, wipe out everything and update the file with the following code:
import React from "react";
import { render } from "react-dom";
import { Provider } from "react-redux";
import store from "./js/store/index";
import App from "./js/components/App";

render(
  <Provider store={store}>
    <App />
  </Provider>,
  document.getElementById("root")
);
As you can see Provider wraps up your React application and makes it aware of the entire Redux's store.
Now let's create the App component. It’s nothing special: App should import a List component and render itself. Create a directory for holding components:
mkdir -p src/js/componentsand a new file named src/js/components/App.js:
// src/js/components/App.js
import React from "react";
import List from "./List";

const App = () => (
  <div>
    <h2>Articles</h2>
      <List />
  </div>
);

export default App;
Save and close the file, then move on to creating List.
React Redux tutorial: List component and Redux state
We have done nothing special so far. But our new component, List, will interact with the Redux store.
A brief recap: the key for connecting a React component with Redux is connect. Connect takes at least one argument.
Since we want List to get a list of articles it's a matter of connecting state.articles with the component. How? With mapStateToProps. Note that "mapStateToProps" is just a convention, most developers for example use "select".
Create a new file named src/js/components/List.js. It should look like so:
// src/js/components/List.js

import React from "react";
import { connect } from "react-redux";

const mapStateToProps = state => {
  return { articles: state.articles };
};

const ConnectedList = ({ articles }) => (
  <ul>
    {articles.map(el => (
      <li key={el.id}>{el.title}</li>
    ))}
  </ul>
);

const List = connect(mapStateToProps)(ConnectedList);

export default List;
The List component receives the prop articles which is a copy of the articles array we saw in the Redux state. It comes from the reducer:
const initialState = {
  articles: []
};

function rootReducer(state = initialState, action) {
  if (action.type === ADD_ARTICLE) {
    return Object.assign({}, state, {
      articles: state.articles.concat(action.payload)
    });
  }
  return state;
}
Always remember: the state in redux comes from reducers.
Finally the component gets exported as List. List is the result of connecting the stateless component ConnectedList with the Redux store.
Still confused? Understanding how connect works will take some time. But fear not, the road to learn Redux is paved with "ah-ha" moments.
I suggest taking a break for exploring both connect and mapStateToProps.
Head over the next section when you're ready!
React Redux tutorial: Form component and Redux actions
The Form component we're going to create is a bit more complex than List. It's a form for adding new items to our application and for that we'll use a JavaScript class.
Disclaimer: I wrote this tutorial when React didn't have hooks yet. I could use a functional component here, but to avoid twisting the tutorial I'll stick with classes.
The class component will help keeping some local state, like form inputs. It receives a Redux action as well. This way it can update the global state by dispatching the addArticle action.
Create a new file in src/js/components/Form.js with the following code:
// src/js/components/Form.jsx
import React, { Component } from "react";
import { connect } from "react-redux";
import { addArticle } from "../actions/index";

function mapDispatchToProps(dispatch) {
  return {
    addArticle: article => dispatch(addArticle(article))
  };
}

class ConnectedForm extends Component {
  constructor(props) {
    super(props);
    this.state = {
      title: ""
    };
    this.handleChange = this.handleChange.bind(this);
    this.handleSubmit = this.handleSubmit.bind(this);
  }

  handleChange(event) {
    this.setState({ [event.target.id]: event.target.value });
  }

  handleSubmit(event) {
    event.preventDefault();
    const { title } = this.state;
    this.props.addArticle({ title });
    this.setState({ title: "" });
  }
  render() {
    const { title } = this.state;
    return (
      <form onSubmit={this.handleSubmit}>
        <div>
          <label htmlFor="title">Title</label>
          <input
            type="text"
            id="title"
            value={title}
            onChange={this.handleChange}
          />
        </div>
        <button type="submit">SAVE</button>
      </form>
    );
  }
}

const Form = connect(
  null,
  mapDispatchToProps
)(ConnectedForm);

export default Form;
A brief explanation of the component:
- standard React stuff beside mapDispatchToProps and connect
- mapDispatchToProps connects Redux actions to React props
- the handleSubmit method dispatches an action
To connect action creators to a component you can use the function form:
function mapDispatchToProps(dispatch) {
  return {
    addArticle: article => dispatch(addArticle(article))
  };
}
In alternative, you can also pass mapDispatchToProps as an object. Take a look here.
Finally, the component gets exported as Form. Form is the result of connecting ConnectedForm with the Redux store.
Note: the first argument for connect must be null when mapStateToProps is absent like in our example. Or you'll get TypeError: dispatch is not a function.
Our components are all set! Now update App to include the Form component:
import React from "react";
import List from "./List";
import Form from "./Form";

const App = () => (
  <>
    <div>
      <h2>Articles</h2>
      <List />
    </div>
    <div>
      <h2>Add a new article</h2>
      <Form />
    </div>
  </>
);

export default App;
Run the development server with:
npm startYou should see our working proof of concept (in the first version of this tutorial I used Bootstrap, then removed).
Nothing fancy but still useful for showing React and Redux at work!
The List component on the left talks to the Redux store. It will re-render whenever you add a new item.
You did it! But we're not done yet! In the next section we'll look at Redux middleware. Hold tight!
React Redux tutorial: what is a Redux middleware?
So far we saw the building blocks of Redux: store, the traffic policeman.Reducers, which makes the state in Redux.
Then there are actions, plain JavaScript objects, acting as messengers in your application. Finally, we have action creators, functions for creating those messages.
Now, imagine the following scenario: you need to prevent users from creating articles with particular words inside the title. Let’s take a look at handleSubmit in Form.js:
  handleSubmit(event) {
    event.preventDefault();
    const { title } = this.state;
    this.props.addArticle({ title });
    this.setState({ title: "" });
  }
We can just add a check before this.props.addArticle right? It could be something along these lines:
  handleSubmit(event) {
    event.preventDefault();
    const { title } = this.state;
    const forbiddenWords = ['spam', 'money'];
    const foundWord = forbiddenWords.filter(word => title.includes(word) )
    if (foundWord) {
      return this.props.titleForbidden();
    }
    this.props.addArticle({ title });
    this.setState({ title: "" });
  }
Wasn't the entire point of Redux to move the logic out of our React components? So what? Can we check the title property inside the reducer? Maybe! While there let's dispatch another action in response to a forbidden word ... but, how I'm supposed to access dispatch inside a reducer?
It's clear we want to reach for something different. Looks like we want to check the action payload (and the title property) before the action goes to the reducer. There should be a way for tapping into the application's flow. Guess what, that's exactly what a Redux middleware does.
A Redux middleware is a function that is able to intercept, and act accordingly, our actions, before they reach the reducer. While the theory is quite simple, a Redux middleware can look a bit confusing.
In its basic form a Redux middleware is a function returning a function, which takes next as a parameter. Then the inner function returns another function which takes action as a parameter and finally returns next(action). Here's how it looks like:
function forbiddenWordsMiddleware() {
  return function(next){
    return function(action){
      // do your stuff
      return next(action);
    }
  }
}
This last point is really important: you should always call next(action) in your middleware. If you forget it, Redux stops, and no other action will reach the reducer. next(action) moves the application forward by calling the next middleware in the chain.
In a middleware you can also access getState and dispatch:
function forbiddenWordsMiddleware({ getState, dispatch }) {
  return function(next){
    return function(action){
      // do your stuff
      return next(action);
    }
  }
}
What's also interesting is that the middleware doesn't exit after next(action). If you're interested in reading the next state of the app after the middleware chain runs you can capture it with getState after next(action):
function forbiddenWordsMiddleware({ getState, dispatch }) {
  return function(next){
    return function(action){
      // do your stuff
      const nextAction = next(action);
      // read the next state
      const state = getState();
      // return the next action
      return nextAction;
    }
  }
}
Still, don't forget to return the next action at the end.
I know, you want to cry and change career but bear with me. Middleware in Redux is super important because they will hold the bulk of your application's logic. If you think about it there is no better place than a middleware for abstracting away business logic.
Armed with that knowledge we can create our first Redux middleware: it should check whether the action's payload has bad words into it. We’ll see the actual implementation into the next section.
React Redux tutorial: your first Redux middleware
The middleware we're going to build should inspect the action's payload. There are a lot of benefits from using a Redux middleware:
- most of the logic can live outside the UI library
- middleware become reusable pieces of logic, easy to reason about
- middleware can be tested in isolation
So, let's get our hands dirty. Create a new folder for the middleware:
mkdir -p src/js/middlewareNow create a new file named in src/js/middleware/index.js. The structure of our first middleware should be like:
function forbiddenWordsMiddleware({ dispatch }) {
  return function(next){
    return function(action){
      // do your stuff
      return next(action);
    }
  }
}
For now we don't need getState, we just get dispatch as the first parameter. Nice. Now we need to check the action payload, namely the title property. If the title matches one or more bad words we stop the user from adding the article.
Also, the check should fire up only when the action is of type ADD_ARTICLE. It makes sense. How about this one:
import { ADD_ARTICLE } from "../constants/action-types";

const forbiddenWords = ["spam", "money"];

export function forbiddenWordsMiddleware({ dispatch }) {
  return function(next) {
    return function(action) {
      // do your stuff
      if (action.type === ADD_ARTICLE) {

        const foundWord = forbiddenWords.filter(word =>
          action.payload.title.includes(word)
        );

        if (foundWord.length) {
          return dispatch({ type: "FOUND_BAD_WORD" });
        }
      }
      return next(action);
    };
  };
}
Here’s what the middleware does: when action type is ADD_ARTICLE check if action.payload.title contains a bad word. If it does then dispatch an action of type FOUND_BAD_WORD, otherwise let the next middleware run.
Now, time to wire up forbiddenWordsMiddleware to the Redux store. For that we need to import our middleware, another utility from Redux (applyMiddleware), and then cook everything together.
Open up src/js/store/index.js and modify the file like so:
// src/js/store/index.js

import { createStore, applyMiddleware } from "redux";
import rootReducer from "../reducers/index";
import { forbiddenWordsMiddleware } from "../middleware";

const store = createStore(
  rootReducer,
  applyMiddleware(forbiddenWordsMiddleware)
);

export default store;Note: if you want to enable Redux Dev Tools use this code.
Save and close the file, run npm start and check if the middleware works. Try to add an article with "money" in its title and you won't see the new article appear in the list.
The middleware works! Good job! In the next sections we'll explore asynchronous actions in Redux with Redux Thunk and Redux Saga.
Watch Redux course lesson 5, working with middlewares
React Redux tutorial: asynchronous actions in Redux, the naive way
So far we were dealing with synchronous data. That is, dispatching an action is synchronous. No AJAX, no promises. We return a plain object from our action creators. And when the action reaches the reducer we return the next state.
Now, suppose we want to fetch data from an API. In React you would put a call in componentDidMount and call it a day. But how about Redux? What's a good place for calling asynchronous functions? Let’s think a moment about it.
Reducers? No way. Reducers should stay lean and clean. A reducer is not a good place for asynchronous logic.
Actions? How I am supposed to do that? Actions in Redux are plain objects. And how about action creators? An action creator is a function, and it looks like a nice spot for calling an API! Let's give it a shot.
We'll create a new action named getData. This action calls an API with Fetch and returns a Redux action.
Open up src/js/actions/index.js and create a new action named getData:
// src/js/actions/index.js

// ...
// our new action creator. Will it work?
export function getData() {
  return fetch("https://jsonplaceholder.typicode.com/posts")
    .then(response => response.json())
    .then(json => {
      return { type: "DATA_LOADED", payload: json };
    });
}
It makes sense. Will it work? Let's wire up a React component to dispatch getData from componentDidMount. mapDispatchToProps (this time with the object shorthand form) will map Redux action creators to our component's props. Create a new React component in src/js/components/Posts.js:
import React, { Component } from "react";
import { connect } from "react-redux";
import { getData } from "../actions/index";

export class Post extends Component {
  constructor(props) {
    super(props);
  }

  componentDidMount() {
    // calling the new action creator
    this.props.getData();
  }

  render() {
    return null;
  }
}

export default connect(
  null,
  { getData }
)(Post);
Finally update src/js/components/App.js to use the new component:
import React from "react";
import List from "./List";
import Form from "./Form";
import Post from "./Posts";

const App = () => (
  <>
    <div>
      <h2>Articles</h2>
      <List />
    </div>
    <div>
      <h2>Add a new article</h2>
      <Form />
    </div>
    <div>
      <h2>API posts</h2>
      <Post />
    </div>
  </>
);

export default App;
Save and close the files, run the app, and look at the console: "Error: Actions must be plain objects. Use custom middleware for async actions". We cannot call Fetch from within an action creator in Redux. Now what?
For making things work we need a custom middleware. Luckily there's something ready for us: redux-thunk.
Asynchronous actions in Redux with Redux Thunk
We just learned that calling Fetch from an action creator does not work.
That's because Redux is expecting objects as actions, but we're trying to return a Promise.
With redux-thunk (it's a middleware) we can overcome the problem and return functions from action creators. This way we can call APIs, delay the dispatch of an action, and more.
First we need to install the middleware with:
npm i redux-thunk --save-devNow let's load the middleware in src/js/store/index.js:
import { createStore, applyMiddleware, compose } from "redux";
import rootReducer from "../reducers/index";
import { forbiddenWordsMiddleware } from "../middleware";
import thunk from "redux-thunk";

const storeEnhancers = window.__REDUX_DEVTOOLS_EXTENSION_COMPOSE__ || compose;

const store = createStore(
  rootReducer,
  storeEnhancers(applyMiddleware(forbiddenWordsMiddleware, thunk))
);

export default store;
At this point we need to refactor getData to use redux-thunk. Open up src/js/actions/index.js and update the action creator like so:
export function getData() {
  return function(dispatch) {
    return fetch("https://jsonplaceholder.typicode.com/posts")
      .then(response => response.json())
      .then(json => {
        dispatch({ type: "DATA_LOADED", payload: json });
      });
  };
}
That's redux-thunk! To access the state inside the action creator you can also add getState in the parameter's list.
Also, notice the use of dispatch inside then to dispatch the next action after Fetch completes.
With that in place we're ready to update our reducer with the new action type.
Open up src/js/reducers/index.js and add a new if statement. We can also add a new key inside the initial state for saving the articles from the API:
import { ADD_ARTICLE } from "../constants/action-types";

const initialState = {
  articles: [],
  remoteArticles: []
};

function rootReducer(state = initialState, action) {
  if (action.type === ADD_ARTICLE) {
    return Object.assign({}, state, {
      articles: state.articles.concat(action.payload)
    });
  }

  if (action.type === "DATA_LOADED") {
    return Object.assign({}, state, {
      remoteArticles: state.remoteArticles.concat(action.payload)
    });
  }
  return state;
}

export default rootReducer;
(I know, DATA_LOADED should be its own named constant. I left it as an exercise for you. Hope you don't mind!)
Finally, we're ready to update our Post component for displaying our "remote" posts. We will use mapStateToProps (again, feel free to call this function select) for selecting ten posts:
import React, { Component } from "react";
import { connect } from "react-redux";
import { getData } from "../actions/index";

export class Post extends Component {
  constructor(props) {
    super(props);
  }

  componentDidMount() {
    this.props.getData();
  }

  render() {
    return (
      <ul>
        {this.props.articles.map(el => (
          <li key={el.id}>{el.title}</li>
        ))}
      </ul>
    );
  }
}

function mapStateToProps(state) {
  return {
    articles: state.remoteArticles.slice(0, 10)
  };
}

export default connect(
  mapStateToProps,
  { getData }
)(Post);
Save and close the files, run the app, and everything should work fine! Good job!
To recap: Redux does not understand other types of actions other than a plain object.
If you want to move asynchronous logic from React to Redux and being able to return functions instead of plain objects you have to use a custom middleware.
redux-thunk is a middleware for Redux. With redux-thunk you can return functions from action creators, not only objects. You can do asynchronous work inside your actions and dispatch other actions in response to AJAX calls.
When to use redux-thunk? redux-thunk is a nice middleware that works very well for most use cases. But, if your asynchronous logic involves more complex scenarios, or if you have specific requirements, then redux saga might be a better fit.
In the next section we'll take a look at it. Hold tight!
Watch Redux course lesson 6, asynchronous actions with redux-thunk
React Redux tutorial: introducing Redux Saga
redux-thunk makes perfect sense for a lot of project. You can also entirely skip redux-thunk and move your asynchronous logic to a custom middleware. But in reality asynchronous actions can be trickier to test and organize.
For this reason most developers prefer an alternative approach: redux-saga.
What is redux-saga? redux-saga is a Redux middleware for managing side effects. With redux-saga you can have a separate thread in your application for dealing with impure actions: API calls, storage access, and more.
redux-saga is different from an async action in terms of both syntax and code organization. With redux-thunk you can put an API call directly inside an action creator while in redux-saga you can have clear separation between synchronous and asynchronous logic.
Worth noting, redux-saga does not use regular JavaScript function. You will see a lot of asterisks and "yield" in your sagas. Those asterisks mark generator functions!
Generator functions in JavaScript are function which can be paused and resumed on demand. redux-saga relies heavily on generator functions but the good thing is that you won't need to call next() in your code. redux-saga handles that for you under the hood.
Writing your first Redux Saga
In this section we will refactor our code to use a Redux saga instead of a thunk. I won't cover the entire Saga API in this post so please bear with me. We'll just take a look at a bunch of methods.
Before getting started install redux saga with:
npm i redux-saga --save-devNow we can refactor our async action and remove the fetch call. From now on our action creator will just dispatch a plain action. Open up src/js/actions/index.js and modify getData to return a plain action named DATA_REQUESTED:
export function getData() {
  return { type: "DATA_REQUESTED" };
}
The DATA_REQUESTED action will be intercepted by Redux saga with takeEvery. You can imagine takeEvery taking every DATA_REQUESTED action passing inside our app and starting some work in response to that action.
Now, how do you structure a saga? A redux saga could live in a single file containing:
- a worker function
- a watcher function
The watcher is a generator function watching for every action we are interested in. In response to that action, the watcher will call a worker saga, which is another generator function for doing the actual API call.
The worker saga will call the remote API with call from redux-saga/effects. When the data is loaded we can dispatch another action from our saga with put, again, from redux-saga/effects.
Armed with this knowledge we can lay down our first Redux saga. First create a new folder for holding your sagas:
mkdir -p src/js/sagasThen create a new file named api-saga.js in src/js/sagas. And here's our saga:
import { takeEvery, call, put } from "redux-saga/effects";

export default function* watcherSaga() {
  yield takeEvery("DATA_REQUESTED", workerSaga);
}

function* workerSaga() {
  try {
    const payload = yield call(getData);
    yield put({ type: "DATA_LOADED", payload });
  } catch (e) {
    yield put({ type: "API_ERRORED", payload: e });
  }
}
Let's take a break to read through the logic flow of our saga.
Demystifying your first redux saga
Take a look at the code above. Here's how it works:
- take every action named
DATA_REQUESTEDand for each action spin a worker saga - inside the worker saga call a function named
getData - if the function succeeds, then dispatch (put) a new action named
DATA_LOADEDalongside with a payload - if the function errors out, then dispatch (put) a new action named
API_ERRORED, alongside with a payload (the error)
The only thing we're missing in our code is getData. Open up src/js/sagas/api-saga.js again and add the function:
import { takeEvery, call, put } from "redux-saga/effects";

export default function* watcherSaga() {
  yield takeEvery("DATA_REQUESTED", workerSaga);
}

function* workerSaga() {
  try {
    const payload = yield call(getData);
    yield put({ type: "DATA_LOADED", payload });
  } catch (e) {
    yield put({ type: "API_ERRORED", payload: e });
  }
}

function getData() {
  return fetch("https://jsonplaceholder.typicode.com/posts").then(response =>
    response.json()
  );
}
Finally we can wire up redux saga to our redux store. Open up src/js/store/index.js and update the store as follows:
import { createStore, applyMiddleware, compose } from "redux";
import rootReducer from "../reducers/index";
import { forbiddenWordsMiddleware } from "../middleware";
import createSagaMiddleware from "redux-saga";
import apiSaga from "../sagas/api-saga";

const initialiseSagaMiddleware = createSagaMiddleware();

const storeEnhancers = window.__REDUX_DEVTOOLS_EXTENSION_COMPOSE__ || compose;

const store = createStore(
  rootReducer,
  storeEnhancers(
    applyMiddleware(forbiddenWordsMiddleware, initialiseSagaMiddleware)
  )
);

initialiseSagaMiddleware.run(apiSaga);

export default store;
Notice createSagaMiddleware and initialiseSagaMiddleware.run for running our saga. Now close and save the file. Run npm start and You should see the exact same output again with the remote posts correctly displaying in the browser.
Congratulations! You created your first redux saga! And now a couple of exercises for you:
- our reducer was ready for handling
DATA_LOADEDalongside with its payload. Complete the reducer for dealing withAPI_ERRORED. - move
DATA_LOADED,API_ERRORED, andDATA_REQUESTEDin named constants. - do we need to better account for fetch errors inside getData?
CODE: you can access the complete example at react-redux-tutorial on Github. Clone the repo and checkout the most recent branch:
git clone https://github.com/valentinogagliardi/react-redux-tutorial
cd react-redux-tutorial
git checkout your-first-redux-sagaSagas and parameters
Worker sagas take the actual action as a parameter:
function* workerSaga(action) {
// omit
}
That means we can use an action payload if present. So if your Post component dispatches an action with its payload (look at componentDidMount):
// src/js/components/Posts.js

import React, { Component } from "react";
import { connect } from "react-redux";
import { getData } from "../actions/index";

export class Post extends Component {
  componentDidMount() {
    this.props.getData("https://api.valentinog.com/api/link/");
  }

  render() {
    return (
      <ul>
        {this.props.articles.map(el => (
          <li key={el.id}>{el.title}</li>
        ))}
      </ul>
    );
  }
}

function mapStateToProps(state) {
  return {
    articles: state.remoteArticles.slice(0, 10)
  };
}

export default connect(mapStateToProps, { getData })(Post);
and the action creator returns the payload too:
// src/js/actions/index.js

export function getData(url) {
  return { type: "DATA_REQUESTED", payload: { url } };
}
We can access the action in our worker saga and pass the action payload (url in this case) to getData:
import { takeEvery, call, put } from "redux-saga/effects";

export default function* watcherSaga() {
  yield takeEvery("DATA_REQUESTED", workerSaga);
}

function* workerSaga(action) {
  try {
    // pass the action payload to getData
    const payload = yield call(getData, action.payload.url);
    yield put({ type: "DATA_LOADED", payload });
  } catch (e) {
    yield put({ type: "API_ERRORED", payload: e });
  }
}

function getData(url) {
  return fetch(url).then(response => response.json());
}
Modern Redux with Redux Toolkit
In the late months of 2018 Redux saw the introduction of Redux starter kit, later renamed to Redux Toolkit. Redux Toolkit aims to simplify Redux with a convenient abstraction over the "boilerplate" that so many developers complained about.
In the following sections we'll explore Redux Toolkit side by side with "classic" Redux code. To illustrate Redux Toolkit we'll see a "vanilla" JavaScript application, no React for now. I assume you've got a webpack development environment. You could also use create-react-app, just replace the content of index.js with my code.
Modern Redux with Redux Toolkit: configureStore
Let's start with store creation. We saw createStore as a way to create a store in Redux. It takes a root reducer, optional middleware, and optional store enhancers:
import { createStore, applyMiddleware } from "redux";

const middleware = [
  /*YOUR CUSTOM MIDDLEWARES HERE*/
];

const initialState = {
  token: "",
};

function rootReducer(state = initialState, action) {
  // DO STUFF
  return state;
}

const store = createStore(rootReducer, applyMiddleware(...middleware));
We can also split reducers with combineReducers:
import { createStore, combineReducers, applyMiddleware } from "redux";

const middleware = [
  /*YOUR CUSTOM MIDDLEWARES HERE*/
];

// AUTH STATE
const authState = {
  token: "",
};

function authReducer(state = authState, action) {
  // DO STUFF
  return state;
}

const rootReducer = combineReducers({
  auth: authReducer,
});

const store = createStore(rootReducer, applyMiddleware(...middleware));
If you were to add Redux Dev Tool to the mix, store creation would become a bit crowded:
import { createStore, combineReducers, applyMiddleware, compose } from "redux";
const storeEnhancers = window.__REDUX_DEVTOOLS_EXTENSION_COMPOSE__ || compose;

const middleware = [
  /*YOUR CUSTOM MIDDLEWARES HERE*/
];

// AUTH STATE
const authState = {
  token: "",
};

function authReducer(state = authState, action) {
  // DO STUFF
  return state;
}

const rootReducer = combineReducers({
  auth: authReducer,
});

const store = createStore(
  rootReducer,
  storeEnhancers(applyMiddleware(...middleware))
);
With configureStore from Redux Toolkit we can simplify store creation. First, install the toolkit with:
npm i @reduxjs/toolkitThen, replace createStore with configureStore:
import { configureStore } from "@reduxjs/toolkit";

const middleware = [
  /*YOUR CUSTOM MIDDLEWARES HERE*/
];

// AUTH STATE
const authState = {
  token: "",
};

function authReducer(state = authState, action) {
  // DO STUFF
  return state;
}

const store = configureStore({
  reducer: {
    auth: authReducer,
  },
  middleware,
});
No need to compose anything, no boilerplate: configureStore accepts a configuration object where you can define:
- a root reducer, or an object of slices
- your middleware
- optional store enhancers
- a preloaded state
What's included in configureStore?
- Redux Dev Tool out of the box
- redux-thunk
Just pay attention to include the default middleware with getDefaultMiddleware when you pass an array of custom middleware:
import { configureStore, getDefaultMiddleware } from "@reduxjs/toolkit";

const middleware = [
  ...getDefaultMiddleware(),
  /*YOUR CUSTOM MIDDLEWARES HERE*/
];

// AUTH STATE
const authState = {
  token: "",
};

function authReducer(state = authState, action) {
  // DO STUFF
  return state;
}

const store = configureStore({
  reducer: {
    auth: authReducer,
  },
  middleware,
});
Modern Redux with Redux Toolkit: createAction
The next utility function from Redux Toolkit is createAction. It's good practice in Redux to have action creators and named actions for almost every behaviour of the app.
Consider again this "classic" Redux example with some actions: LOGIN_SUCCESS, FETCH_LINKS_REQUEST, and FETCH_LINKS_SUCCESS (without even accounting for errors! That would make the boilerplate grow even bigger in this example):
import { createStore, combineReducers, applyMiddleware, compose } from "redux";
const storeEnhancers = window.__REDUX_DEVTOOLS_EXTENSION_COMPOSE__ || compose;

// NAMED ACTIONS AND ACTION CREATORS
const LOGIN_SUCCESS = "LOGIN_SUCCESS";
const FETCH_LINKS_REQUEST = "FETCH_LINKS_REQUEST";
const FETCH_LINKS_SUCCESS = "FETCH_LINKS_SUCCESS";

function loginSuccess(payload) {
  return { type: LOGIN_SUCCESS, payload };
}

function fetchLinksRequest() {
  return { type: FETCH_LINKS_REQUEST };
}

function fetchLinksSuccess(payload) {
  return { type: FETCH_LINKS_SUCCESS, payload };
}

//

const middleware = [
  /*YOUR CUSTOM MIDDLEWARES HERE*/
];

// AUTH STATE
const authState = {
  token: "",
};

function authReducer(state = authState, action) {
  // DO STUFF
  return state;
}

const rootReducer = combineReducers({
  auth: authReducer,
});

const store = createStore(
  rootReducer,
  storeEnhancers(applyMiddleware(...middleware))
);
That's definitively too much boilerplate. With createAction we can get rid of action creators and named actions to condense all in one place:
import {
  configureStore,
  getDefaultMiddleware,
  createAction,
} from "@reduxjs/toolkit";

const loginSuccess = createAction("LOGIN_SUCCESS");
const fetchLinksRequest = createAction("FETCH_LINKS_REQUEST");
const fetchLinksSuccess = createAction("FETCH_LINKS_SUCCESS");

const middleware = [
  ...getDefaultMiddleware(),
  /*YOUR CUSTOM MIDDLEWARES HERE*/
];

// AUTH STATE
const authState = {
  token: "",
};

function authReducer(state = authState, action) {
  // DO STUFF
  return state;
}

const store = configureStore({
  reducer: {
    auth: authReducer,
  },
  middleware,
});
Each of these calls to createAction are actual action creators ready to be called, with an optional payload:
// Creates an action creator
const loginSuccess = createAction("LOGIN_SUCCESS");

// Calls the action creator
store.dispatch(loginSuccess("aPayload"))
Now, let's turn our attention to reducers.
Modern Redux with Redux Toolkit: createReducer
After actions creators and named actions, reducers are where most of the Redux "boilerplate" grows. Traditionally you would have a switch with a group of case for handling action types (again, back to "classic" Redux):
// NAMED ACTIONS AND ACTION CREATORS
const LOGIN_SUCCESS = "LOGIN_SUCCESS";
const LOGIN_FAILED = "LOGIN_FAILED";

function loginSuccess(payload) {
  return { type: LOGIN_SUCCESS, payload };
}

function loginFailed(payload) {
  return { type: LOGIN_FAILED, payload };
}

// Reducer
const authState = {
  token: "",
  error: "",
};

function authReducer(state = authState, action) {
  switch (action.type) {
    case LOGIN_SUCCESS:
    // return the next state
    case LOGIN_FAILED:
    // return the next state
    default:
      return state;
  }
}
The "issue" pops up soon when we need to return the next state without touching the initial state. It could be done in two ways. With Object.assign:
function authReducer(state = authState, action) {
  switch (action.type) {
    case LOGIN_SUCCESS:
      return Object.assign({}, state, { token: action.payload });
    case LOGIN_FAILED:
      return Object.assign({}, state, { error: action.payload });
    default:
      return state;
  }
}
Or with an object spread (ECMAScript 2018):
function authReducer(state = authState, action) {
  switch (action.type) {
    case LOGIN_SUCCESS:
      return { ...state, token: action.payload };
    case LOGIN_FAILED:
      return { ...state, error: action.payload };
    default:
      return state;
  }
}
Now, what if I tell you can cut things out with createReducer? This utility function from Redux Toolkit takes an initial state, and a mapping object where:
- properties in this mapping are action types
- values are reducing function
Pair this with actions from createAction, which have their toString() configured to return the action type, and you can refactor this:
// NAMED ACTIONS AND ACTION CREATORS
const LOGIN_SUCCESS = "LOGIN_SUCCESS";
const LOGIN_FAILED = "LOGIN_FAILED";

function loginSuccess(payload) {
  return { type: LOGIN_SUCCESS, payload };
}

function loginFailed(payload) {
  return { type: LOGIN_FAILED, payload };
}

// Reducer
const authState = {
  token: "",
  error: "",
};

function authReducer(state = authState, action) {
  switch (action.type) {
    case LOGIN_SUCCESS:
    // return the next state
    case LOGIN_FAILED:
    // return the next state
    default:
      return state;
  }
}
to this:
import {
  configureStore,
  getDefaultMiddleware,
  createAction,
  createReducer,
} from "@reduxjs/toolkit";

const loginSuccess = createAction("LOGIN_SUCCESS");
const loginFailed = createAction("LOGIN_FAILED");

const authState = {
  token: "",
  error: "",
};

const authReducer = createReducer(authState, {
  [loginSuccess]: (state, action) => {
    // return the next state
  },
  [loginFailed]: (state, action) => {
    // return the next state
  },
});

// rest omitted for brevity
Wait! createReducer really shines when dealing with mutations. Under the hood it uses immer, which allows for writing mutative logic, which in reality does not alter the original object. We can refactor our "classic" reducer from:
function authReducer(state = authState, action) {
  switch (action.type) {
    case LOGIN_SUCCESS:
      return { ...state, token: action.payload };
    case LOGIN_FAILED:
      return { ...state, error: action.payload };
    default:
      return state;
  }
}
To:
const authReducer = createReducer(authState, {
  [loginSuccess]: (state, action) => {
    state.token = action.payload;
  },
  [loginFailed]: (state, action) => {
    state.error = action.payload;
  },
});
Look how clean it is. No need to return the next state too. Let's now see the big picture with createSlice.
Modern Redux with Redux Toolkit: createSlice
createSlice is the holy grail of Redux. It is able to keep everything in a single place: reducers, action creators, state. Let's see what we got so far with Redux Toolkit:
import {
  configureStore,
  getDefaultMiddleware,
  createAction,
  createReducer,
} from "@reduxjs/toolkit";

const loginSuccess = createAction("LOGIN_SUCCESS");
const loginFailed = createAction("LOGIN_FAILED");
// we don't need this now const fetchLinksRequest = createAction("FETCH_LINKS_REQUEST");
// we don't need this now const fetchLinksSuccess = createAction("FETCH_LINKS_SUCCESS");

const middleware = [
  ...getDefaultMiddleware(),
  /*YOUR CUSTOM MIDDLEWARES HERE*/
];

// AUTH STATE
const authState = {
  token: "",
  error: "",
};

const authReducer = createReducer(authState, {
  [loginSuccess]: (state, action) => {
    state.token = action.payload;
  },
  [loginFailed]: (state, action) => {
    state.error = action.payload;
  },
});

const store = configureStore({
  reducer: {
    auth: authReducer,
  },
  middleware,
});
With createSlice we can simplify even more, and our code becomes:
import {
  configureStore,
  getDefaultMiddleware,
  createSlice,
} from "@reduxjs/toolkit";

const middleware = [
  ...getDefaultMiddleware(),
  /*YOUR CUSTOM MIDDLEWARES HERE*/
];

// AUTH STATE
const authState = {
  token: "",
  error: "",
};

const authSlice = createSlice({
  name: "auth",
  initialState: authState,
  reducers: {
    loginSuccess: (state, action) => {
      state.token = action.payload;
    },
    loginFailed: (state, action) => {
      state.error = action.payload;
    },
  },
});

const { loginSuccess, loginFailed } = authSlice.actions;
const authReducer = authSlice.reducer;

const store = configureStore({
  reducer: {
    auth: authReducer,
  },
  middleware,
});
At first, it's not easy to understand what createSlice is doing, but with a little help we can make it. It accepts:
- a slice name
- an initial state for the reducer
- an object with "case reducers"
const authSlice = createSlice({
  name: "auth",
  initialState: authState,
  reducers: {
    loginSuccess: (state, action) => {
      state.token = action.payload;
    },
    loginFailed: (state, action) => {
      state.error = action.payload;
    },
  },
});
The slice name is the action prefix. For example if I dispatch:
store.dispatch( loginSuccess("some_asasa_token") )The generated action is:
{ type: "auth/loginSuccess", payload: "some_asasa_token" }The "case reducers" are the same as a classic switch block of a reducer. This reducer:
// classic reducer
function authReducer(state = authState, action) {
  switch (action.type) {
    case LOGIN_SUCCESS:
      // return the next state
    case LOGIN_FAILED:
      // return the next state
    default:
      return state;
  }
}
Translates to the reducers key of the slice:
const authSlice = createSlice({
  name: "auth",
  initialState: authState,
  reducers: {
    loginSuccess: (state, action) => {
      state.token = action.payload;
    },
    loginFailed: (state, action) => {
      state.error = action.payload;
    },
  },
});
In exchange createSlice returns action creators:
const { loginSuccess, loginFailed } = authSlice.actions;And a reducer as well:
const authReducer = authSlice.reducer;The reducer is used in configureStore:
const authReducer = authSlice.reducer;

const store = configureStore({
  reducer: {
    auth: authReducer,
  },
  middleware,
});
With createSlice we come full circle . To learn more about all the configuration options make sure to refer the official documentation.
Modern Redux with Redux Toolkit: createAsyncThunk
We saw redux-thunk as the preferred middleware for handling asynchronous logic in Redux.
With redux-thunk we can write asynchronous action creators for making API calls, setting timers, or working with Promise.
Here's a typical skeleton of an asynchronous action creator with redux-thunk:
export function getUsers() {
  return function(dispatch) {
     //
  };
}
When dealing with API calls most of the time we need to handle three different actions in Redux:
FETCH_ENTITY_REQUESTFETCH_ENTITY_FAILUREFETCH_ENTITY_SUCCESS
ENTITY here could be any model we want to fetch from the API.
We dispatch these actions from an asynchronous action in three phases:
- when the request starts
- if the request fails
- if the request succeeds
Consider the following example with Fetch:
function getUsers() {
  return function(dispatch) {
    // notify about fetch start
    dispatch({ type: "FETCH_USERS_REQUEST" });

    return fetch("/api/users/")
      .then(response => {
        if (!response.ok) throw Error(response.statusText);
        return response.json();
      })
      .then(json =>
        /* notify about success*/
        dispatch({
          type: "FETCH_USERS_SUCCESS",
          payload: json
        })
      )
      .catch(error =>
        /* notify about failure*/
        dispatch({
          type: "FETCH_USERS_FAILURE",
          payload: error.message
        })
      );
  };
}
This action creator can trigger in response to some user interaction like:
const button = document.getElementById("fetch");

button.addEventListener("click", function() {
  store.dispatch(getUsers());
});
Here I've inlined actions as simple objects, in real world you would create them with createAction, or inside a slice.
These actions end up in the reducer for notifying the interface, and the user, about the request's fate.
Redux Toolkit includes redux-thunk out of the box, so the above thunk will work fine.
However, we can take advantage of createAsyncThunk to clean up the above code, and to create those three actions automatically:
const getUsers = createAsyncThunk("users/getUsers", () => {
  return fetch("/api/users/")
    .then(response => {
      if (!response.ok) throw Error(response.statusText);
      return response.json();
    })
    .then(json => json);
});
What createAsyncThunk does here, is to automatically create an action creator for each Promise state. For example if we name our async thunk "users/getUsers", it generates:
- pending: "users/getUsers/pending"
- rejected: "users/getUsers/rejected"
- fulfilled: "users/getUsers/fulfilled"
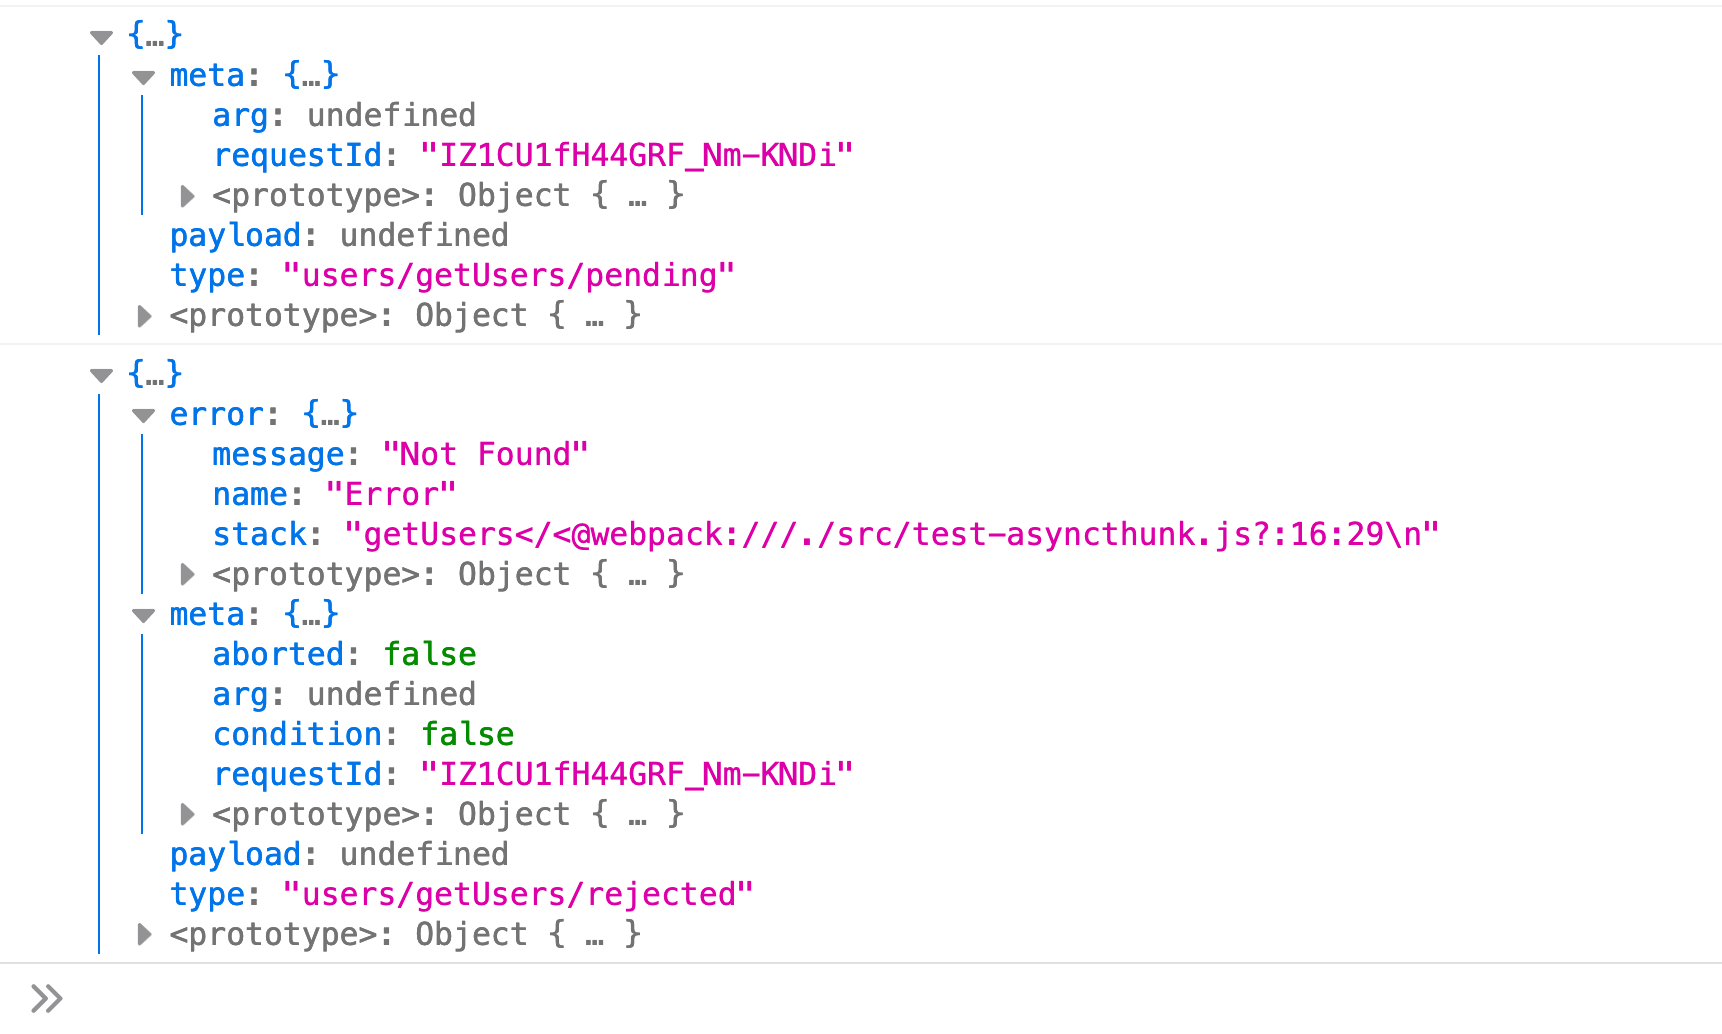
Here's what you'll see for example for a rejected Promise (I logged the actions with a custom middleware):
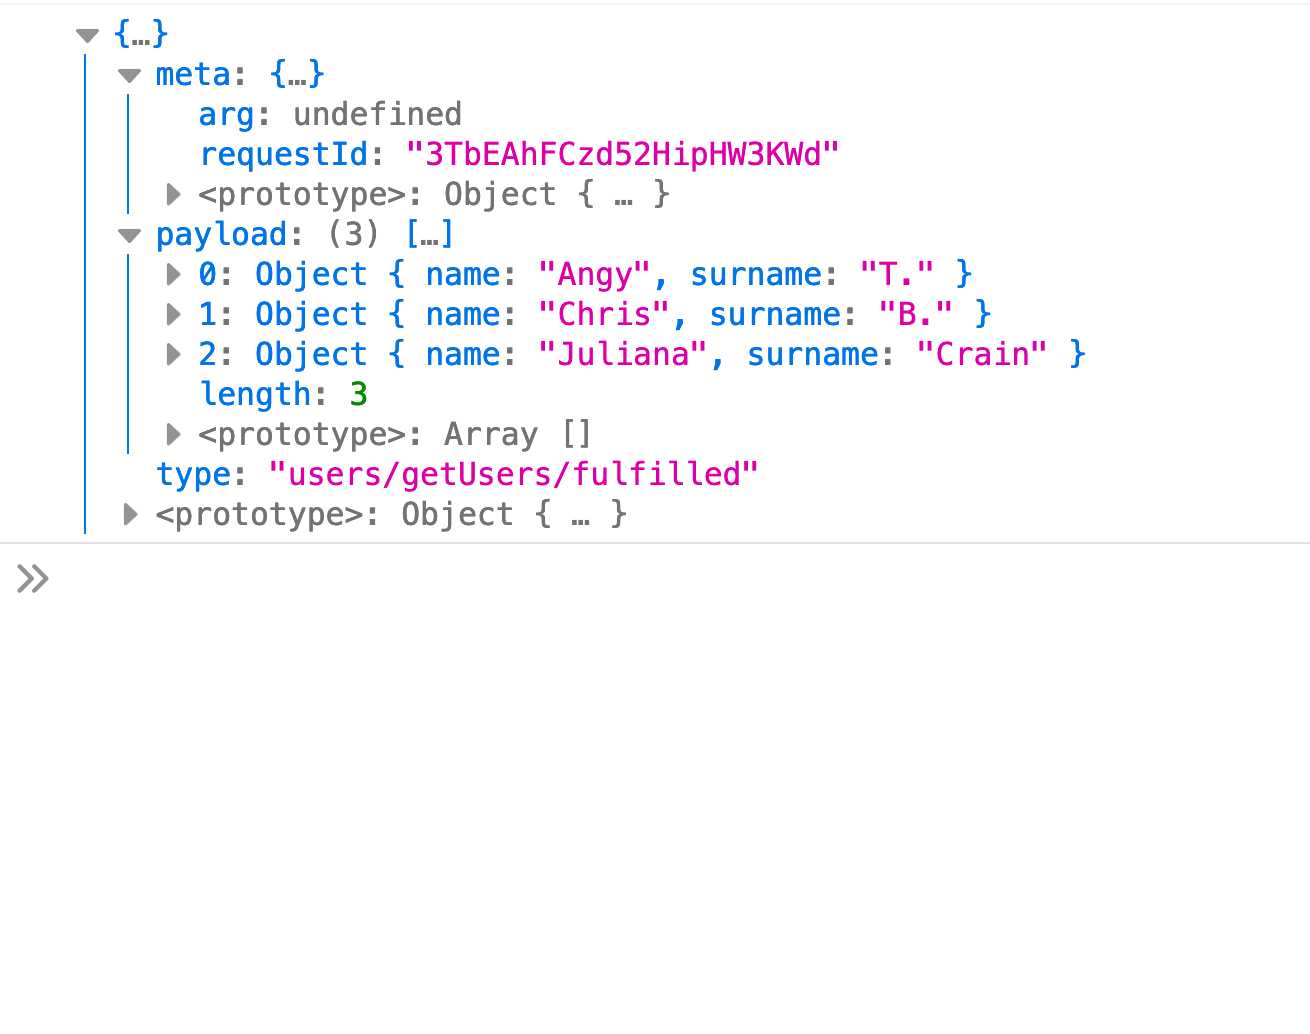
For a resolved Promise instead you'll see:
At this point you'll handle each action in the slice, as extra reducers:
const usersSlice = createSlice({
  name: "users",
  initialState: {
    loading: "",
    error: "",
    data: []
  },
  reducers: {
    // REGULAR REDUCERS
  },
  extraReducers: {
    [getUsers.pending]: state => {
      state.loading = "yes";
    },
    [getUsers.rejected]: (state, action) => {
      state.loading = "";
      state.error = action.error.message;
    },
    [getUsers.fulfilled]: (state, action) => {
      state.loading = "";
      state.data = action.payload;
    }
  }
});
To get the error message from the reject Promise you'll access action.error.message.
To get instead the API's payload you'll access action.payload.
If you need to access thunk's parameters to use dispatch or getState, pass the thunkAPI parameter to the callback function (or destructure what you need):
const getUsers = createAsyncThunk("users/getUsers", (thunkAPI) => {
  return fetch("/api/users/")
    .then(response => {
      if (!response.ok) throw Error(response.statusText);
      return response.json();
    })
    .then(json => json);
});
If you want to pass an argument to the action creator (an endpoint for example), pass a parameter in the callback function:
const getUsers = createAsyncThunk("users/getUsers", (arg) => {
  return fetch(arg)
    .then(response => {
      if (!response.ok) throw Error(response.statusText);
      return response.json();
    })
    .then(json => json);
});
Then provide the argument when you call the action creator:
const button = document.getElementById("fetch");

button.addEventListener("click", function() {
  store.dispatch(getUsers("/api/users/"));
});
What's also appealing in createAsyncThunk, is the ability to abort Fetch requests.
Head over the documentation for a complete example.
Modern Redux with Redux Toolkit: create-react-app template
Coming soon
Wrapping up
What a journey! I hope you learned something from this guide. Tried my best to keep things as simple as possible. Pick Redux, play with it and take your time to absorb all the concepts.
Redux used to have a lot of boilerplate and moving parts. Don't get discouraged. With Redux Toolkit now it's easier to write Redux logic.
After reading this tutorial you can tune on this free Redux course of mine where I cover Redux from zero to toolkit.
Thanks for reading and stay tuned on this blog!
Further resources
Recommended read: the official style guide for writing Redux code.
