4 ways to fake an API in frontend development
 Table of Contents
Who this guide is for and what you need to know
This guide assumes a basic understanding of testing theory and testing runners.
The examples are in pure JavaScript.
To experiment with the examples you should have a working installation of Node.js on your system.
To skip directly to practice jump here, otherwise take some theory first!
Terminology: stubbing, mocking, and fake APIs
The need for fake APIs
Tests, and the software components we want to test, most of the times have dependencies. A typical dependency might be an external data source for example.
Think of a piece of code for fetching data from an RESTFUL API. The API and more specifically its response, is the dependency for our piece of code.
Fetching and displaying data is one of the most common use cases for a front-end library. This is usually done by contacting an external RESTFUL API which holds some JSON for us.
It would be impractical to call the real API in a testing environment, or in development. There are a number of reasons for not doing this.
First, tests must not depend on external services. A test using a real API could fail if:
- the API has intermittent or permanent network issues
- the API gets rate-limited
- the API is slow
On the other hand, you don't want to use the actual RESTFUL API in development neither because:
- the API could be a paid service, you'll incur in high costs
- you're behind a firewall which blocks outbound connections
- the API is slow
Also, more often than not, frontend developers need, and want, to develop in isolation long before the RESTFUL API is 100% ready.
It's here that mocking and stubbing come into play.
What is mocking? What is stubbing?
In software development, mocking and stubbing are two terms closely related to testing.
It's important to note that the concept of "fakes" in testing and development are not new by any means. There's also another definition for these fakes: test doubles.
In the context of a typical frontend application, mocking and stubbing help to "fake" the real API, by replacing it with a fabricated service, or with a "surgical" swap of a single function.
This is particularly useful when working on decoupled frontend architectures, which more often than not talk to remote APIs, not always under our direct control.
What's the difference between mocking and stubbing?
- Mocking means replacing one or more function in testing with a fake copy
- Stubbing means replacing some external service , or a network response, with a fake version
Mocking is also when you assert on the mocked function to see:
- if it has been called by another piece of code
- how many times has been called
- how many parameters has been called with
So, mocking or stubbing?
As you can see the distinction between mocking and stubbing is not so evident.
To clarify better:
Mocking aims at replacing the so called outgoing dependencies of our tests: network calls in our case. For example, we can mock Fetch or XMLHttpRequest and swap the actual function with our own version.
Stubbing instead is a technique for replacing incoming dependencies, like a network response.
The way most of the frontend mocking/stubbing tools work is that they need to intercept and replace Fetch or XMLHttpRequest to provide a fake response. In a stricter sense they always mock functions.
Another category of tools, like json-server are proper stubs because they don't touch the actual code under test.
Both technique have their use cases. Let's explore in this post the most common approaches to mocking and stubbing in the context of a frontend application.
Setting up the project
To start off, clone this minimal development environment:
git clone https://github.com/valentinogagliardi/stubbing-mocking.git

cd stubbing-mocking
Once inside install the dependencies:
npm iOpen up the project in your favorite editor, and you're good to go.
Mirage JS
Let's begin this tour with the first library of the group: Mirage JS. Based on another library, Pretender, it offers an interesting approach to API mocking.
Installing Mirage js
To install the library in your project run:
npm i miragejs --save-devScenario
We want to intercept and mock API response in development or in testing.
API mocking with Mirage Js
Suppose we have a piece of interface where the user clicks and starts a Fetch call. To follow along create a new HTML file in src/index.html with the following document:
<!DOCTYPE html>
<html lang="en">
<head>
    <meta charset="UTF-8">
    <title>Mocking and stubbing in frontend development</title>
</head>
<body>
<div>
    <button id="fetch-btn">FETCH</button>
</div>
</body>
</html>
In another file, src/index.js place the following logic:
/*
Fetch the data on button click
 */
const button = document.getElementById("fetch-btn");

button.addEventListener("click", function() {
  fetch("/api/users/")
    .then(response => {
      if (!response.ok) throw Error(response.statusText);
      return response.json();
    })
    .then(json => buildList(json));
});

/*
Build the user's list
 */
function buildList(data) {
  console.log(data);
}Note: the file should be exactly src/index.js because it's picked up by webpack.
Here, to intercept the call to /api/users/ with Mirage JS we can use its Server object, configured with a fake endpoint:
import { Server } from "miragejs";

new Server({
  routes() {
    this.namespace = "api";

    this.get("/users/", () => {
      return [
        { name: "Angy", surname: "T." },
        { name: "Chris", surname: "B." },
        { name: "Juliana", surname: "Crain" }
      ];
    });
  }
});
This code can live in the same file src/index.js for simplicity, or in another file imported in the project.
Here's the complete code:
import { Server } from "miragejs";

new Server({
  routes() {
    this.namespace = "api";

    this.get("/users/", () => {
      return [
        { name: "Angy", surname: "T." },
        { name: "Chris", surname: "B." },
        { name: "Juliana", surname: "Crain" }
      ];
    });
  }
});

/*
Fetch the data on button click
 */
const button = document.getElementById("fetch-btn");

button.addEventListener("click", function() {
  fetch("/api/users/")
    .then(response => {
      if (!response.ok) throw Error(response.statusText);
      return response.json();
    })
    .then(json => buildList(json));
});

/*
Build the user's list
 */
function buildList(data) {
  console.log(data);
}
Now run the project with:
npm startOpen up the browser's console, and click the button. You should see the following output in the console:
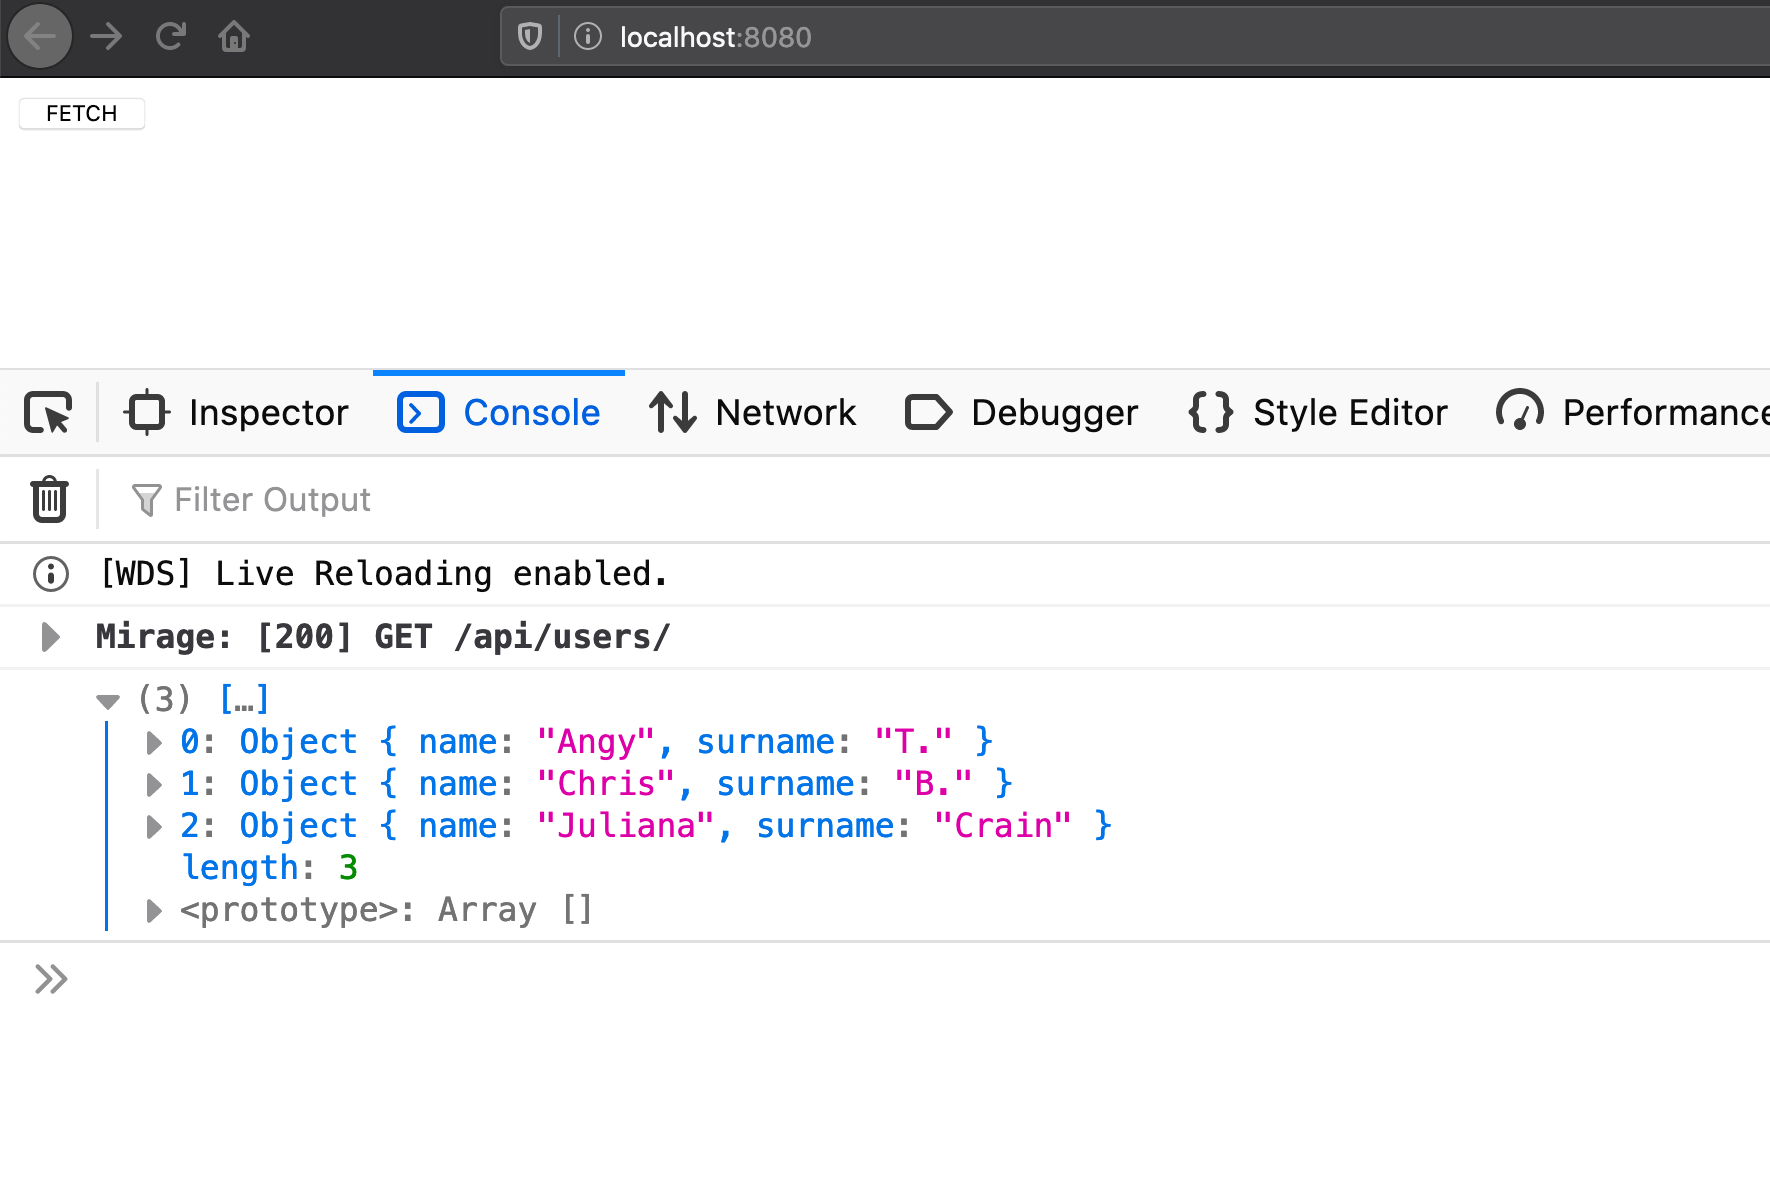
As you can see Mirage JS intercepts the request and provides a fake response. The configuration is pretty straightforward. We can define a namespace for the API:
this.namespace = "api";We can define routes (it accepts all HTTP methods):
    this.get("/users/", () => {
        // return a response
    });
This way when hitting "/api/users/", Mirage JS takes action. This is only a minimal overview of what Mirage JS can do.
Mirage JS has even an ORM, other than support for models and relationships. I encourage you to check the documentation for more advanced examples.
Since Mirage JS can potentially intercept all network requests, you have to be careful to import it only in development.
On webpack-based projects (create-react-app, Vue cli, or the repo you cloned here) you can rely on process.env.NODE_ENV to dynamically import and load the library only in development:
const loadMirage = () => import("miragejs");

export function loadMirageInDev() {
  if (process.env.NODE_ENV === "development") {
    loadMirage().then(({ Server }) => {
      return new Server({
        routes() {
          this.namespace = baseURL;

          this.get("/users/", () => {
            return [/* your stuff here */];
          });

          this.get("/articles/", () => {
            return [/* your stuff here */];
          });
        },
      });
    });
  }
}
This logic can live in a separate file that you import in the main entry point.
Just be aware if you call the API on component mount, created for Vue, componentDidMount or useEffect for React, you have to load Mirage JS before the app shell renders.
Another option is to import Mirage JS only in testing.
Takeaways:
- use MirageJS to mock API calls in development or testing
It's mocking or stubbing? Since Mirage JS replaces Fetch and XMLHttpRequest to provide a fake response, we can say that's mocking. But, this is transparent to us because in our code we don't need to touch Fetch or XMLHttpRequest directly.
MSW is another tool which falls in the same category as Mirage JS, but runs in a Service Worker, which is convenient. Check this out for a comparison.
Jest
Jest is a JavaScript test runner, that is, a JavaScript library for creating, running, and structuring tests.
Jest is one of the most popular test runner these days, and the default choice for many projects.
Scenario
We want to intercept and mock API response in unit testing.
Installing and configuring Jest
To install the library in your project run:
npm i jest --save-devLet's also configure an NPM script for running our tests from the command line.
Open up package.json and configure a script named "test" for running Jest:
  "scripts": {
    "test": "jest"
  },
Since we run Jest from the command line through Node.js, which doesn't include the Fetch API, we need to install a polyfill:
npm i whatwg-fetch --save-devBy default, Jest expects to find test files in a folder called __tests__ in your project folder.
Create the new folder, and inside the same folder create a test in APITest.spec.js. In a moment you'll run the first test.
Mocking Fetch with Jest
In this test we're going to assert on a function which calls /api/users/ on a remote API. We want to test that the function returns an array of users from the API:
const { getUsers } = require("../src/common/usersAPI");

beforeAll(() => {
  require("whatwg-fetch");
});

describe("Users API", () => {
  test("it returns an array of users", async () => {
    const expected = [
      { name: "Jonas", surname: "T." },
      { name: "Chris", surname: "B." },
      { name: "Juliana", surname: "Crain" },
      { name: "Caty", surname: "B." }
    ];

    const json = await getUsers();
    expect(json).toMatchObject(expected);
  });
});
Here we import getUsers from a module (we're going to create it in a minute). Then we test that getUsers returns the expected response.
With beforeAll we load a Fetch polyfill, whatwg-fetch, to make our test as realistic as possible. (This isn't always needed, especially with create-react-app and similar).
Before running the test create a new file in src/common/usersAPI.js with the following code:
const ENDPOINT = "https://api.valentinog.com/api/users/";

function getUsers() {
  return fetch(ENDPOINT)
    .then(response => {
      if (!response.ok) throw Error(response.statusText);
      return response.json();
    })
    .then(json => json);
}

module.exports = { getUsers };
Now run the test with:
npm testYou should see the following errors:
TypeError: Network request failed
// and
Error: Cross origin http://localhost forbidden
I'm expecting it because the URL we're hitting does not exist yet on the server, thus the backend is unable to set the CORS header. Think of a realistic scenario where you've got to develop a UI, but the backend isn't 100% ready yet.
This error is a good opportunity to mock Fetch, so that we can replace window.fetch with a fake version. Here's how you'll do in Jest.
First, in the test we use Jest's spyOn to intercept the method:
    jest.spyOn(window, "fetch").mockImplementation(() => {
      // TODO
    });
Then we provide a fake version of Fetch's response as the mock:
    jest.spyOn(window, "fetch").mockImplementation(() => {
      const fetchResponse = {
        ok: true,
        json: () => Promise.resolve(expected)
      };
      return Promise.resolve(fetchResponse);
    });
Here's the complete test:
const { getUsers } = require("../src/common/usersAPI");

beforeAll(() => {
  require("whatwg-fetch");
});

describe("Users API", () => {
  test("it returns an array of users", async () => {
    const expected = [
      { name: "Jonas", surname: "T." },
      { name: "Chris", surname: "B." },
      { name: "Juliana", surname: "Crain" },
      { name: "Caty", surname: "B." }
    ];

    jest.spyOn(window, "fetch").mockImplementation(() => {
      const fetchResponse = {
        ok: true,
        json: () => Promise.resolve(expected)
      };
      return Promise.resolve(fetchResponse);
    });

    const json = await getUsers();

    expect(json).toMatchObject(expected);
  });
});
At the end of every test if needed restore the real version of Fetch with mockRestore():
const { getUsers } = require("../src/common/usersAPI");

beforeAll(() => {
  require("whatwg-fetch");
});

describe("Users API", () => {
  test("it returns an array of users", async () => {
    // omit

    // DISABLE THE MOCK
    window.fetch.mockRestore();

  });
});
This way you won't interfere with any other test.
Now run the test, and it should pass:
npm testSpying in Jest
Mocking is not only replacing functions with fakes, it also refers to spying on function calls.
Earlier we saw that mocking is also when you assert on the mocked function to see:
- if it has been called by another piece of code
- how many times has been called
- how many parameters has been called with
In Jest, we can make these assertions on the mocked function as follows:
beforeAll(() => {
  require("whatwg-fetch");
});

describe("Users API", () => {
  test("it returns an array of users", async () => {

    // omit

    expect(window.fetch).toHaveBeenCalledWith(
      "https://api.valentinog.com/api/users/"
    );

    expect(window.fetch).toHaveBeenCalledTimes(1);

    expect(json).toMatchObject(expected);

    window.fetch.mockRestore();
  });
});
Here we checked that:
- the function has been called with the appropriate parameter
- the function has been called exactly one time
Takeaways:
- use
jest.spyOnto mockFetchin testing, and to spy on its call.
It's mocking or stubbing? This is proper mocking because we replace Fetch intentionally with our own version to alter the response and to assert on its call.
Cypress
Cypress is a tool for running functional (also called end to end) tests. In contrast to test runners like Jest, which work on the unit level, Cypress spins up a real browser to conduct tests.
(Recently Cypress also got the ability to run unit tests, but that's another story).
Unfortunately as of today Cypress is still unable to intercept Starting from version 4.9.0 Cypress has experimental support for Fetch, but work is ongoing to add support for it.Fetch stubbing. To enable it, configure experimentalFetchPolyfill in cypress.json:
{
  "experimentalFetchPolyfill": true
}
In this section we'll see how to stub an XMLHttpRequest response.
Scenario
We want to intercept and stub API response in functional testing.
Installing and configuring Cypress
To install Cypress in your project run:
npm i cypress --save-devOnce installed, run it for the first time with:
node_modules/.bin/cypress openA bunch of new folder will appear in your project. You can safely remove the example folder.
Let's also configure an NPM script for running our tests from the command line.
Open up package.json and configure a script named "e2e" for running Cypress:
  "scripts": {
    "e2e": "cypress open"
  },
By default, Cypress expects to find test files in the folder called cypress/integration in your project folder.
Create a test in cypress/integration/APITest.spec.js. In a moment you'll run your first test.
Stubbing out a network response with Cypress
The structure of a Cypress test recalls what we saw with Jest:
describe("Users API", () => {
  it("should return an array of users", () => {
    //
  });
});
We have describe, while it has the same meaning of Jest's test block.
In a functional test instead of saying "should return an array of users", we can say "it should see a list of users" because we need to impersonate a real user opening a browser here. So:
describe("Users API", () => {
  it("should see a list of users", () => {
    //
  });
});
Now imagine we want fake the response for the same "/api/users/" endpoint.
In Cypress, we use cy.server to spy on network requests, while cy.route configures a fake API endpoint:
describe("Users API", () => {
  it("should see a list of users", () => {
    cy.visit("http://localhost:8080/");

    cy.server();
    cy.route({
      url: "/api/users/",
      method: "GET",
      response: [
        {
          name: "Juliana",
          surname: "Crain"
        },
        { name: "Molly", surname: "F." }
      ]
    });

    cy.contains("FETCH").click();
  });
});
To try this test, make sure src/index.html is still in place:
<!DOCTYPE html>
<html lang="en">
<head>
    <meta charset="UTF-8">
    <title>Mocking and stubbing in frontend development</title>
</head>
<body>
<div>
    <button id="fetch-btn">FETCH</button>
</div>
</body>
</html>
In src/index.js we need to change the logic to use XMLHttpRequest instead of Fetch:
/*
Fetch the data on button click
 */
const button = document.getElementById("fetch-btn");

button.addEventListener("click", function() {
  // AJAX request with XMLHttpRequest
  const request = new XMLHttpRequest();
  request.open("GET", "/api/users/");
  request.onload = function() {
    const jsonResponse = JSON.parse(this.response);
    buildList(jsonResponse);
  };
  request.send();
});

/*
Build the user's list
 */
function buildList(data) {
  console.log(data);
}
Now run in a terminal:
npm startIn another terminal run Cypress:
npm run e2eYou'll see a window pop up, choose the test we wrote a minute ago and see the test pass:
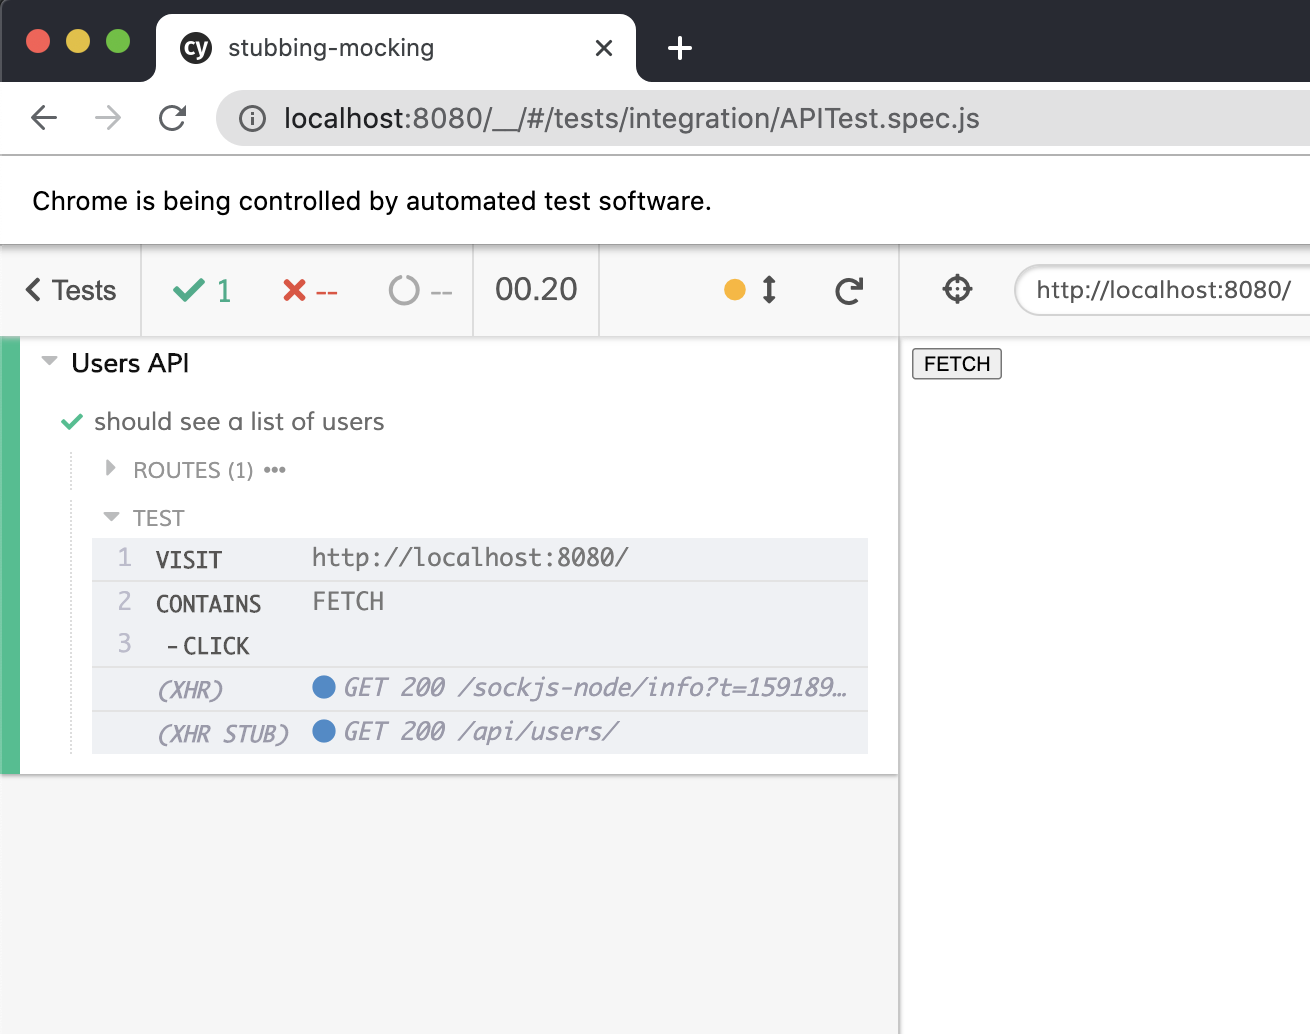
You can see XHR STUB as a confirmation of the stubbing.
In this test we just stubbed out the response, but you can easily build the list with JavaScript and add a test to check for an HTML list in the DOM.
Takeaways:
- use Cypress
cy.serverandcy.routeto stub out API responses in functional testing.
It's mocking or stubbing? Unlike Mirage JS or Jest's spyOn, Cypress wraps and observes XMLHttpRequest to provide a fake response if needed, it does not mock every call. But, when we use cy.route Cypress has to replace XMLHttpRequest with a mocked version. So despite they define this approach as stubbing in the documentation, technically it's still a mock.
In the future Cypress will use a transparent proxy layer for network stubbing.
json-server
The last tool of this tour is json-server, another NPM package for API stubbing. json-server is a proper HTTP server which can listen on the local (or in remote) network.
Scenario
We want to intercept and stub API response in development and testing.
Installing and launching json-server
To install json-server in your project:
npm i json-server --save-devThen create a new file named db.json in your project folder. This file will contain the fake database for our server. Can be something along these lines:
{
  "users": [
    {
      "name": "Jonas",
      "surname": "T."
    },
    {
      "name": "Chris",
      "surname": "B."
    },
    {
      "name": "Juliana",
      "surname": "Crain"
    },
    {
      "name": "Caty",
      "surname": "B."
    }
  ]
}
Now open up package.json and configure a script named "stubapi" for running json-server:
  "scripts": {
    "stubapi": "json-server db.json",
    "test": "jest",
    "e2e": "cypress open"
  },
To launch the server run:
npm run stubapiYou should see the following output in the console:
  Resources
  http://localhost:3000/users

  Home
  http://localhost:3000
That means you can now access http://localhost:3000/users to get a list of fake users.
As you can see this URL structure is the first problem with json-server. It's not easy to get something like http://localhost:3000/api/users without messing up with configuration.
json-server has its own way of structuring routes and responses, and this is a hindrance most of the times.
With the fake server in place we can now test both from unit and functional tests. Let's see.
Unit test with Jest and json-server
To test the stub with Jest open up __tests__/APITest.spec.js, clean up everything, and create the following test:
const { getUsers } = require("../src/common/usersAPI");

beforeAll(() => {
  require("whatwg-fetch");
});

describe("Users API", () => {
  test("it returns an array of users", async () => {
    const expected = [
      { name: "Jonas", surname: "T." },
      { name: "Chris", surname: "B." },
      { name: "Juliana", surname: "Crain" },
      { name: "Caty", surname: "B." }
    ];

    const json = await getUsers("http://localhost:3000/users");

    expect(json).toMatchObject(expected);
  });
});
In this test we don't need to mock anymore, we just call the stub API.
Now open up src/common/usersAPI.js and tweak the function to accept a parameter:
function getUsers(endpoint) {
  return fetch(endpoint)
    .then(response => {
      if (!response.ok) throw Error(response.statusText);
      return response.json();
    })
    .then(json => json);
}

module.exports = { getUsers };
Now run in a terminal:
npm run stubapiIn another terminal run the unit tests:
npm testThe test should pass:
 PASS  __tests__/APITest.spec.js
  Users API
    ✓ it returns an array of users (3 ms)

Test Suites: 1 passed, 1 total
Tests:       1 passed, 1 total
Snapshots:   0 total
Time:        0.962 s, estimated 1 s
Ran all test suites.
Now let's see a functional test.
Functional test with Cypress and json-server
This test is easy too. Open up integration/APITest.spec.js, clean up everything, and create the following test:
describe("Users API", () => {
  it("should see a list of users", () => {
    cy.visit("http://localhost:8080/");

    cy.contains("FETCH").click();

    cy.contains(/Jonas|Chris|Juliana/);
  });
});
In src/index.js make sure to call the stub API:
/*
Fetch the data on button click
 */
const button = document.getElementById("fetch-btn");

button.addEventListener("click", function() {
  // AJAX request with XMLHttpRequest
  const request = new XMLHttpRequest();
  request.open("GET", "http://localhost:3000/users/");
  request.onload = function() {
    const jsonResponse = JSON.parse(this.response);
    buildList(jsonResponse);
  };
  request.send();
});

/*
Build the user's list
 */
function buildList(data) {
  const ul = document.createElement("ul");
  for (const user of data) {
    const li = document.createElement("li");
    // innerText danger!!
    li.innerText = user.name;
    ul.appendChild(li);
  }
  document.body.appendChild(ul);
}
We also build a list for the user.
Now with json-server still listening, run the app in a terminal:
npm startIn another terminal run Cypress:
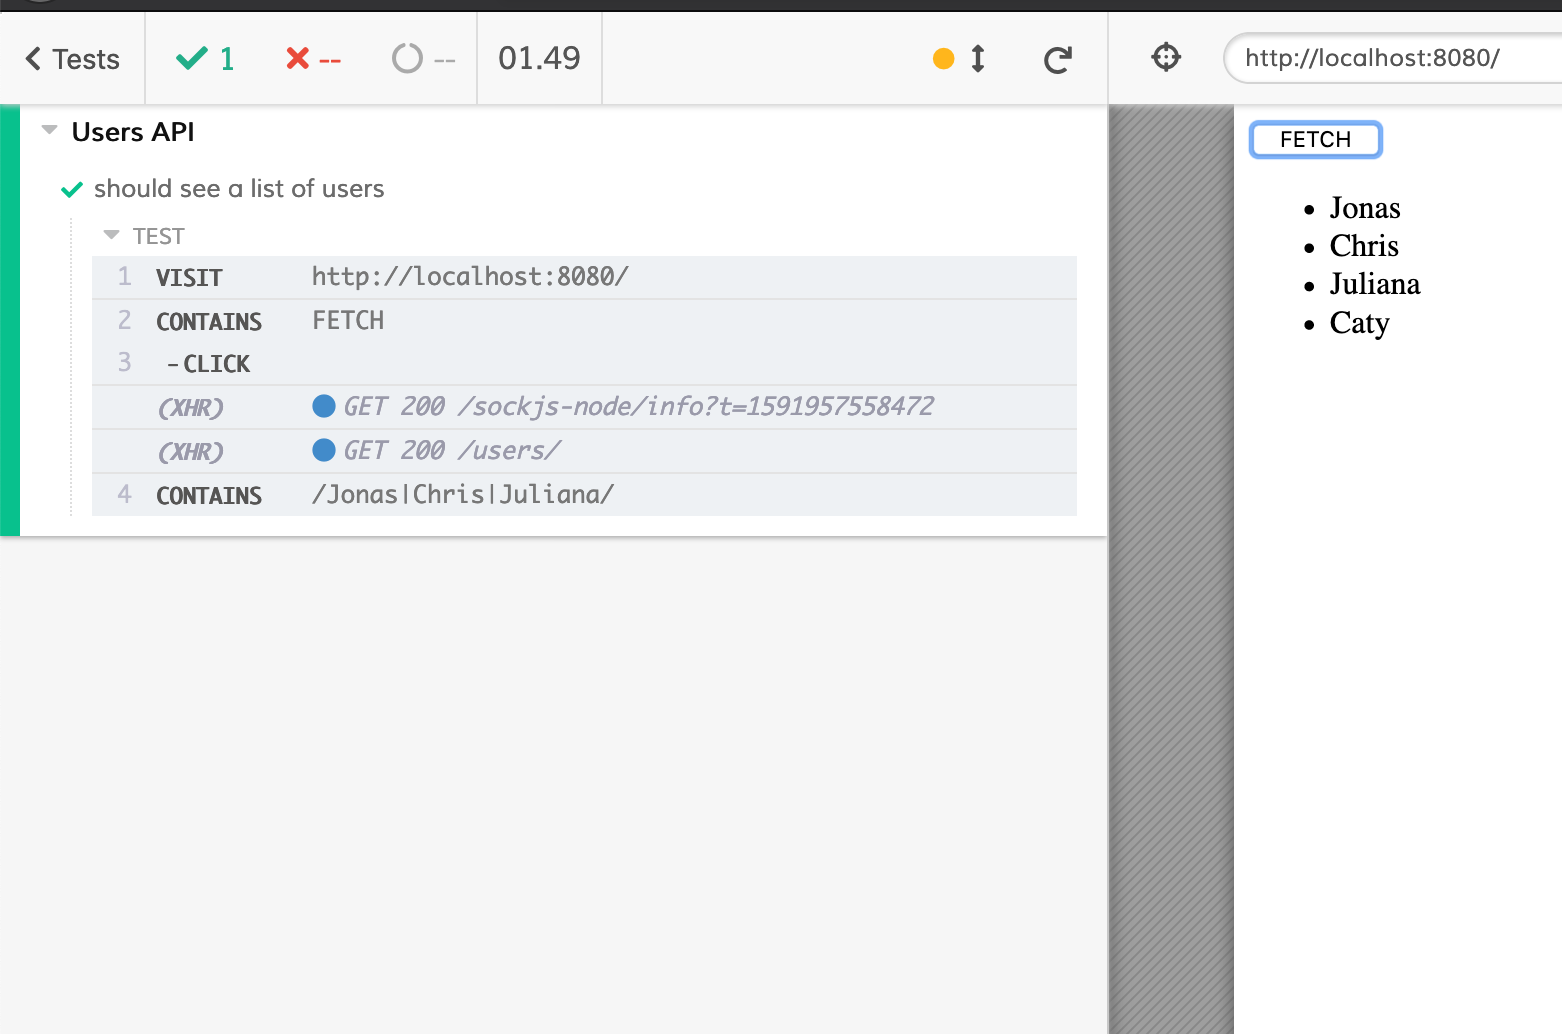
npm run e2eYou'll see a window pop up, choose the test we wrote a minute ago and see the test pass:
Takeaways:
- use json-server to stub API responses in development or testing
It's mocking or stubbing? json-server is a typical example of stub because we provide a fake external service to our tests, without touching anything in our code (apart from the little adjustment to the URL in our example).
How to configure the API URL in React and Vue
It's impractical to hardcode the API's URL in your Fetch or XMLHttpRequest calls, especially when using a tool like json-server.
The common practice is to have a different URL in production, development (or testing).
In React
Create a file named .env.development in your project folder and configure an environment variable prefixed with REACT_APP_:
REACT_APP_BASE_URL=http://localhost:3000Then in your code access the variable like so:
    fetch(`${process.env.REACT_APP_BASE_URL}/users/`)
      .then(/* do your stuff here*/)
      .then(/* do your stuff here*/)
      .catch(/* handle errors*/);
For production instead create a file name .env.production in your project folder and configure an environment variable prefixed with REACT_APP_:
REACT_APP_BASE_URL=https://api.production.ioYour Fetch call remains the same:
    fetch(`${process.env.REACT_APP_BASE_URL}/users/`)
      .then(/* do your stuff here*/)
      .then(/* do your stuff here*/)
.catch(/* handle errors*/);In Vue CLI
Create a file named .env.development in your project folder and configure an environment variable prefixed with VUE_APP_:
VUE_APP_BASE_URL=http://localhost:3000Then in your code access the variable like so:
    fetch(`${process.env.VUE_APP_BASE_URL}/users/`)
      .then(/* do your stuff here*/)
      .then(/* do your stuff here*/)
      .catch(/* handle errors*/);
For production instead create a file name .env.production in your project folder and configure an environment variable prefixed with VUE_APP_:
VUE_APP_BASE_URL=https://api.production.ioYour Fetch call remains the same:
    fetch(`${process.env.VUE_APP_BASE_URL}/users/`)
      .then(/* do your stuff here*/)
      .then(/* do your stuff here*/)
.catch(/* handle errors*/);Wrapping up
At this point you might ask, between all these tools for mocking and stubbing, which one should I use?
It depends! Here's a recap of pros and cons for making an informed decision.
json-server
PROS:
- no need to mock out the code, just call the stub API endpoint
- the fake server can live also remotely
CONS:
- the fake server should be always listening
- if you put the fake server remotely you'll have flaky tests again (network issues, timeouts)
- more server-side code to write
- rigid configuration style
Cypress stubbing
PROS:
- no need to mock out the code, just stub the response
CONS:
- no
Fetchresponse stubbing for now
Jest mocking
PROS:
- high control over the response mock
- can spy parameters and calls
CONS:
- risks of mock-abuse, use them sparingly
- mocks are too much code sometimes
Mirage JS
PROS:
- many features, ORM, relationships
- no need to duplicate server-side code
- highly flexible
CONS: See how it compares to other tools.
