Cypress Tutorial for Beginners: Getting started with End to End Testing
 Table of Contents
Cypress Tutorial for Beginners: requirements
To follow along you need a working installation of Node.js on your system. Also, a basic understanding of a newer version of JavaScript is a plus.
What is Cypress? What is End to End Testing?
End to End Testing, or UI testing is one the many approaches for testing a web application.
An end to end test checks whether a web application works as expected or not, by testing the so called user flow.
Is End to End Testing important? Yes it is. But, nobody likes E2E tests. They can be slow, cumbersome and expensive to write.
On the other hand testing gives you confidence. Would you ship a broken product to your users on purpose?
Enter Cypress: a Javascript End to End testing framework.
This post appeared first in 2017 and has been completely revamped on 2020.
Disclaimer
Before purists yell at me: I know the subtle line between End to End Testing, UI testing, integration testing, and so on.
For you dear reader: testing terminology is so blurry that I can't even .... If it's your first time with JavaScript testing I recommend reading Jest Tutorial for Beginners for an introduction to unit testing and terminology.
When you're done come back here for End to End Testing.
Cypress tutorial for beginners: setting up the project
To start off create a new folder, I called mine cypress-tutorial, move into it and initialize a new JavaScript project:
mkdir cypress-tutorial && cd $_
npm init -y
Inside this folder create two new files. An HTML document in index.html:
<!DOCTYPE html>
<html lang="en">
  <head>
    <meta charset="UTF-8" />
    <title>Cypress tutorial for beginners</title>
  </head>
  <body>
    <main>
      <form>
        <div>
          <label for="name">Name</label>
          <input type="name" required name="name" id="name" />
        </div>
        <div>
          <label for="email">Email</label>
          <input type="email" required name="email" id="email" />
        </div>
        <div>
          <label for="message">Your message</label>
          <textarea id="message" name="message" required></textarea>
        </div>
        <div>
          <button type="submit">SEND</button>
        </div>
      </form>
    </main>
  </body>
  <script src="form.js"></script>
</html>
It is an HTML form with a bunch on inputs and a textarea.
Next up create a JavaScript file in form.js with a minimal logic for handling form submission:
const form = document.forms[0];

form.addEventListener("submit", event => {
  event.preventDefault();
});
Note that I won't add styles to keep things simple. With this simple project in place we're ready to install Cypress.
Installing Cypress
To install Cypress, still in the project folder, run:
npm i cypress --save-devGive it a minute (it needs to download the binary) and then run:
node_modules/.bin/cypress openCypress will start for the first time, and a bunch of new folder will appear in your project. You can safely remove the example folder.
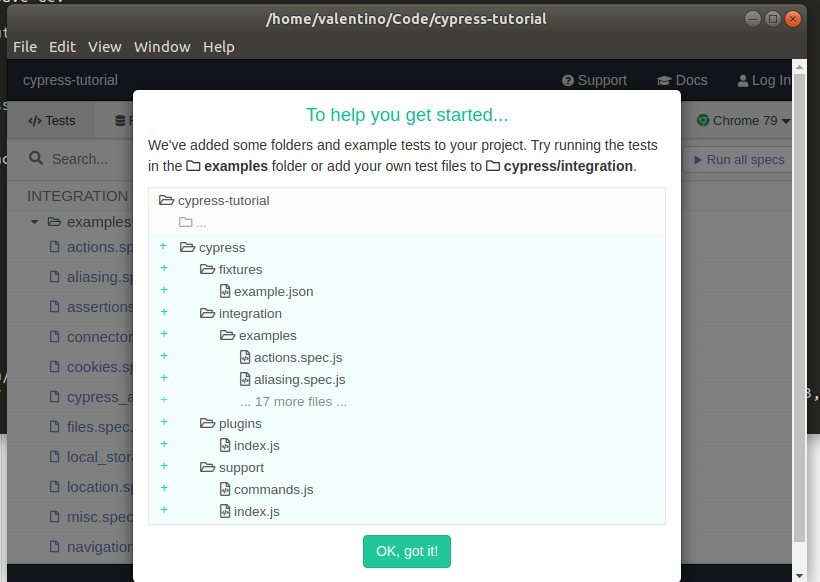
Close the window for now and head over the next section.
Starting the project
To serve the project on the local machine make sure to have a newer version of Node.js installed and then run:
npx serveThis will spin a development server at http://localhost:5000/. Head over the link and you should see our form:

serve is a nice NPM package for development. And now time to write our first test!
Cypress tutorial for beginners: writing your first test
Create a new file in cypress/integration/form.spec.js and write your first block:
describe("Form test", () => {
  //
});
describe is a Cypress method (borrowed from Mocha) for containing one or more related tests. Every time you start writing a new suite of tests for a functionality wrap it in a describe block.
As you can see it takes two arguments: a string for describing the test suite, and a callback function for wrapping the actual test.
Next up we're going to meet another function called it which is the actual test block:
describe("Form test", () => {
  it("Can fill the form", () => {
    //
  });
});
If you know already Jest you may recall that it takes it or test interchangeably. That's not the case with Cypress. it is the only recognized block.
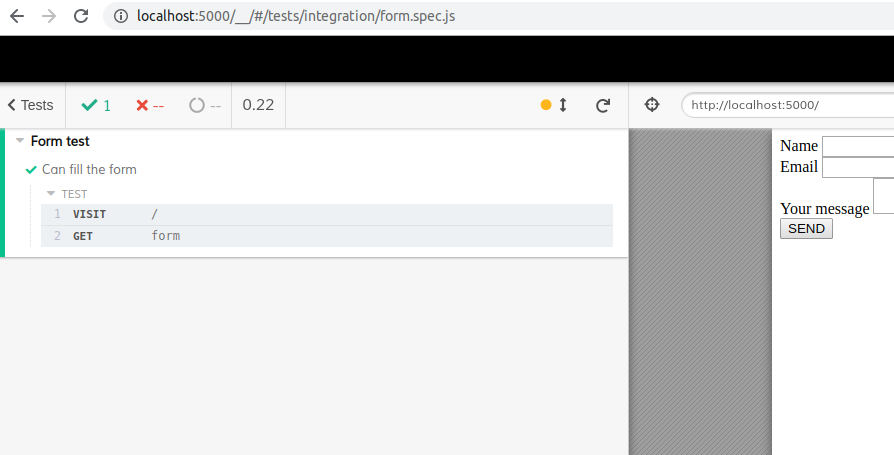
Now time for a smoke test! In the it block write:
describe("Form test", () => {
  it("Can fill the form", () => {
    cy.visit("/");
    cy.get("form");
  });
});
Here cy is Cypress itself. visit is a Cypress method for browsing to a given path.
get instead, is a method for selecting elements in the page. With this code we tell Cypress "go grab the form in the page".
In a minute we'll see Cypress in action, but first, a bit of configuration!
Configuring Cypress
To streamline things a bit we're going to configure Cypress. To begin with open up package.json and create a script named e2e pointing to the Cypress binary:
  "scripts": {
    "e2e": "cypress open"
  },
Next up open cypress.json and configure the base url:
{
  "baseUrl": "http://localhost:5000"
}
With this option we tell Cypress to visit our development url. (5000 is the default port for the serve package).
Now we're ready to launch your first test!
Cypress tutorial for beginners: running the test
Ready? With the development server still running in a terminal:
npx serveopen up another terminal and run:
npm run e2eYou should see Cypress opening a browser and going through the page:
That's your first test passing! Both visit and get are Cypress commands which act also as implicit assertions, that is, if the element is in the page Cypress will consider the test passed.
Now let's continue extending your test to see if the user can fill the form:
describe("Form test", () => {
  it("Can fill the form", () => {
    cy.visit("/");
    cy.get("form");

    cy.get('input[name="name"]').type("Molly");
  });
});
Here's another Cypress command: type, which unsurprisingly types into our first text input. Also, notice the CSS selector for getting the input element.
While there let's also add another command: should. This command creates an assertion and is used for example to check if an input is updating its state as expected:
describe("Form test", () => {
  it("Can fill the form", () => {
    cy.visit("/");
    cy.get("form");

    cy.get('input[name="name"]')
      .type("Molly")
      .should("have.value", "Molly");
  });
});
Notice have.value. If you're new to this concept you can learn more about assertions here.
With a minimal test in place let's continue in the next section.
Cypress tutorial for beginners: more tests, and a submit
To continue our test we can check the email input:
describe("Form test", () => {
  it("Can fill the form", () => {
    cy.visit("/");
    cy.get("form");

    cy.get('input[name="name"]')
      .type("Molly")
      .should("have.value", "Molly");

    cy.get('input[name="email"]')
      .type("molly@dev.dev")
      .should("have.value", "molly@dev.dev");
  });
});
Also, we can type into the text area:
describe("Form test", () => {
  it("Can fill the form", () => {
    cy.visit("/");
    cy.get("form");

    cy.get('input[name="name"]')
      .type("Molly")
      .should("have.value", "Molly");

    cy.get('input[name="email"]')
      .type("molly@dev.dev")
      .should("have.value", "molly@dev.dev");

    cy.get("textarea")
      .type("Mind you if I ask some silly question?")
      .should("have.value", "Mind you if I ask some silly question?");
  });
});
If you left Cypress open the test should watch your changes and run automatically:
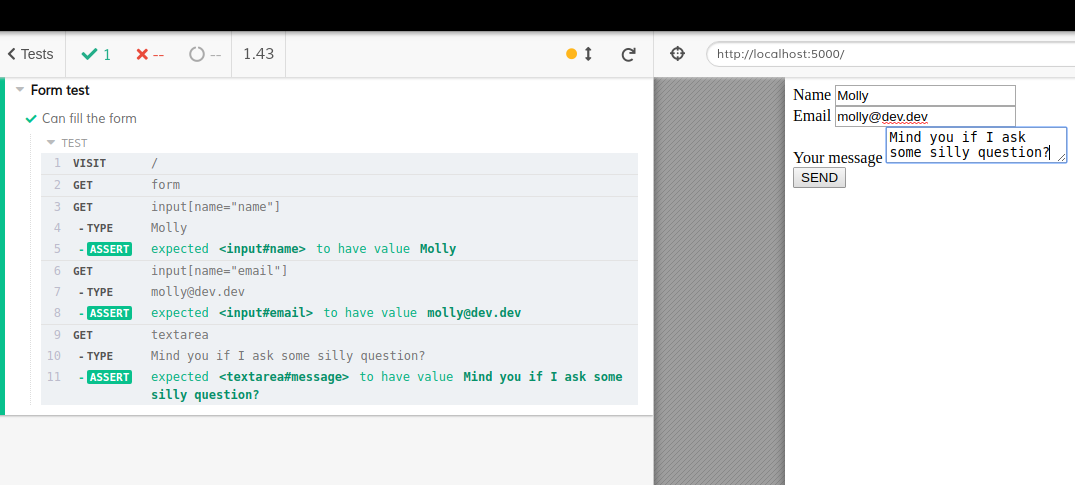
How nice! As icing on the cake let's test form submission with submit:
describe("Form test", () => {
  it("Can fill the form", () => {
    cy.visit("/");
    cy.get("form");

    cy.get('input[name="name"]')
      .type("Molly")
      .should("have.value", "Molly");

    cy.get('input[name="email"]')
      .type("molly@dev.dev")
      .should("have.value", "molly@dev.dev");

    cy.get("textarea")
      .type("Mind you if I ask some silly question?")
      .should("have.value", "Mind you if I ask some silly question?");

    cy.get("form").submit();
  });
});
The test should keep passing without any problem. One thing you can notice are these self-describing commands: type, submit. It's plain english.
Now let's go a bit fancy in the next section with XHR request testing.
Stubbing XHR requests with Cypress
Note: In the "past" (which is 2 or 3 months in the JavaScript land) Cypress used an experimental Fetch polyfill for mocking Fetch calls. They now came up with a new API, called intercept(). Here's the official documentation The following instructions refer to an older version of Cypress.
Among all the things Cypress is also able to intercept AJAX request and provide fake responses. This approach is known as stubbing.
To understand the difference between mocking and stubbing check out this post.
Stubbing is convenient when working in development where you can choose to return fake response to your AJAX requests.
To demonstrate this feature let's add a new piece of code inside our test:
describe("Form test", () => {
  it("Can fill the form", () => {
    cy.visit("/");
    cy.get("form");

    // omitted for brevity

    cy.server();
    cy.route({
      url: "/users/**",
      method: "POST",
      response: { status: "Saved", code: 201 }
    });

    cy.get("form").submit();
  });
});
Here cy.server spins up a "virtual" server while cy.route configures a fake API endpoint.
Now let's add another test to check things out: after the user submits the form we want to test that the fake API is responding. Why so?
Stubbing is useful because we can bypass the real API altogether in development. Let's extend the test with cy.contains:
describe("Form test", () => {
  it("Can fill the form", () => {
    cy.visit("/");
    cy.get("form");

    // omitted for brevity

    cy.server();
    cy.route({
      url: "/users/**",
      method: "POST",
      response: { status: "Form saved!", code: 201 }
    });

    cy.get("form").submit();

    cy.contains("Form saved!");
  });
});
The test is expected to fail because there is no logic in place for sending the form to an API. In the next section we'll make the test pass.
Sending form data to an API
At the time of writing Cypress couldn't intercept Fetch requests. Starting from version 4.9.0 Cypress has experimental support for Fetch stubbing. To enable it, configure experimentalFetchPolyfill in cypress.json:
{
  "baseUrl": "http://localhost:5000",
  "experimentalFetchPolyfill": true
}
In this example written pre 4.9.0 we're going to use XMLHttpRequest. Open up form.js and implement the logic:
const form = document.forms[0];

form.addEventListener("submit", event => {
  event.preventDefault();
  new FormData(form);
});

document.addEventListener("formdata", event => {
  const body = Object.fromEntries(event.formData.entries());
  const jsonBody = JSON.stringify(body);
  const request = new XMLHttpRequest();
  request.open("POST", "https://jsonplaceholder.typicode.com/users/");
  request.send(jsonBody);
});
In this snippet I'm using the formdata event, dispatched when we call new FormData.
In the event listener we build an object with fromEntries (ECMAScript 2019). The we send the data to an API.
To make the test pass we also need to get the response back from the API and save it to the document. For doing so, we can listen on the onload event of XMLHttpRequest:
// omit
document.addEventListener("formdata", event => {
  const body = Object.fromEntries(event.formData.entries());
  const jsonBody = JSON.stringify(body);
  const request = new XMLHttpRequest();
  request.open("POST", "https://jsonplaceholder.typicode.com/users/");
  request.send(jsonBody);
  // get the response
  request.onload = function() {
    const jsonResponse = JSON.parse(this.response);
  };
});
Finally, we can dangerously (just for keeping things simple) save the response in the page (please don't do this in a serious codebase):
// omit
  request.onload = function() {
    const jsonResponse = JSON.parse(this.response);
    document.body.innerHTML += `Response from the server: ${jsonResponse.status}`;
  };
Now it's time to see the test passing!
Stubbing XHR requests with Cypress: a passing test
To recap here's the complete test in cypress/integration/form.spec.js:
describe("Form test", () => {
  it("Can fill the form", () => {
    cy.visit("/");
    cy.get("form");

    cy.get('input[name="name"]')
      .type("Molly")
      .should("have.value", "Molly");

    cy.get('input[name="email"]')
      .type("molly@dev.dev")
      .should("have.value", "molly@dev.dev");

    cy.get("textarea")
      .type("Mind you if I ask some silly question?")
      .should("have.value", "Mind you if I ask some silly question?");

    cy.server();
    cy.route({
      url: "/users/**",
      method: "POST",
      response: { status: "Form saved!", code: 201 }
    });

    cy.get("form").submit();

    cy.contains("Form saved!");
  });
});
Here's the complete code for form.js:
const form = document.forms[0];

form.addEventListener("submit", event => {
  event.preventDefault();
  new FormData(form);
});

document.addEventListener("formdata", event => {
  const body = Object.fromEntries(event.formData.entries());
  const jsonBody = JSON.stringify(body);
  const request = new XMLHttpRequest();
  request.open("POST", "https://jsonplaceholder.typicode.com/users/");
  request.send(jsonBody);
  // get the response
  request.onload = function() {
    const jsonResponse = JSON.parse(this.response);
    document.body.innerHTML += `Response from the server: ${jsonResponse.status}`;
  };
});
One thing to keep in mind is that the real API would not likely return the same shape of our fake stub. When developing a real app you do need to adapt your tests to the real system.
For now, we're good and if you kept Cypress opened you should already see the test passing:
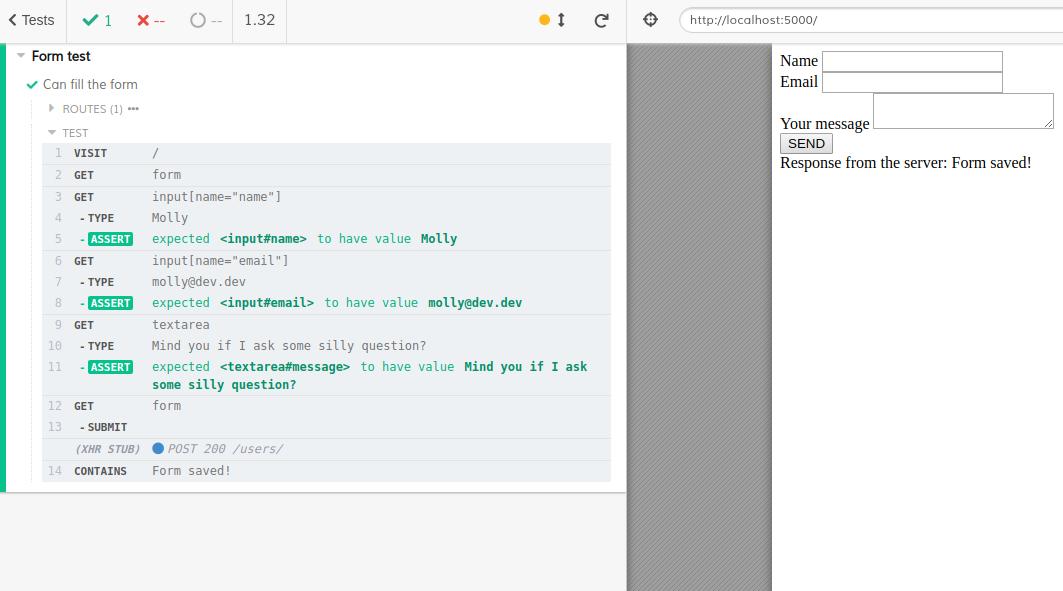
You can see the routes section at the top left and XHR stub in the test output, sign Cypress has intercepted the POST request.
That's one of the best features of Cypress, not counting the dozens of commands and assertions ready to use.
With stubbing we can conclude the tutorial. Great job!
Cypress tutorial for beginners: conclusions
I hope you learned something new with this tutorial, and you'll apply these concepts to your next project! Testing is important!
End to end testing shouldn't be hard: Cypress makes it pleasing and enjoyable. The team at Cypress really nailed it.
Plus, the documentation is pure gold: Cypress Docs are filled up with best practices and examples.
Thanks for reading!
